My USB MIDI experiments gradually evolved into a FM synthesizer. I’m not that familiar with synths in general, so let me know if there is something important missing or things don’t function as expected. Any ideas to improve the synth itself or the UI are welcome. I studied a few online FM synths and videos, and stole some of the most useful features from them, while trying to make the synth simple to use (for a FM synth) and not too computationally heavy. (@laamaa, here is the MIDI synth project I mentioned long time ago in another thread)

In FM synthesis the basic idea is to use one operator (=oscillator + amp envelope) to modulate the frequency of another operator. If the modulating frequency is less than 20 Hz you get vibrato, but in FM synthesis you use frequencies that are 0.5 to over 10 times the frequency of the note that is played. When the modulation frequency increases, the vibrato effect disappears, and completely new waveforms are created. Different instruments and sound effects can be made by tuning the frequency ratios and amplitudes of the modulating operators and varying their amplitudes over time with amplitude envelopes.
Features:
- 4 operators
- 11 algorithms (=how operators are routed)
- One master ADSR envelope and for each operator an ADS envelope with loop option
- (+/-) feedback on operator 4
- Pitch LFO for vibrato
- 4 voice polyphony
- 32 kHz samplerate (44 kHz was too much with 4 voices)
- USB MIDI input supporting key velocity, pitch bend and sustain
- Virtual piano keyboard
FMSynth.bin (111.5 KB)
Source code: https://github.com/jpfli/FMSynth
Source code for a version that works also on simulator: FMSynth-sim.zip (120.1 KB)
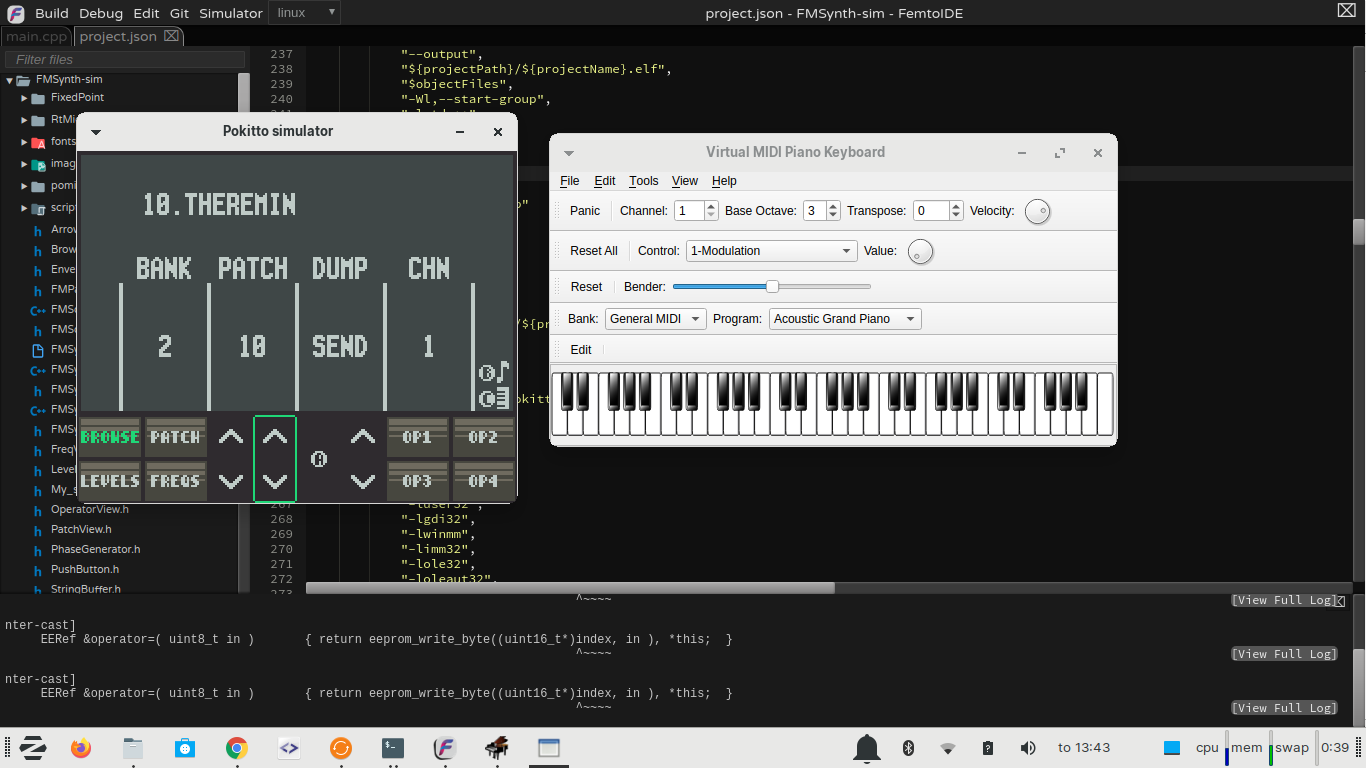
A MIDI keyboard can be used with the synth, but it can also be used without anything connected to Pokitto. For standalone use there is a virtual piano keyboard, that you can toggle with C button. You can even play simple songs with the virtual keyboard using only two buttons and d-pad. Such as this theremin tune (couldn’t get audio playthrough to work in Audacity, so I had to record without hearing the sound myself):
Here’s another sample with different instruments. In this one I played MIDI tracks on LMMS, which is sending MIDI messages to Pokitto.
How to use the virtual piano keyboard
Details
Controls:
- C - show/hide the keyboard
- LEFT/RIGHT - select note on the keyboard
- B - play the selected note
- A - sustain
- UP/DOWN - pitch bend
Pressing B at any time plays a note, even when the virtual keyboard is hidden. You can move left or right on the keyboard also while holding B, in which case the note keeps playing until you stop at another key and a new note is triggered. You can use this feature to play instruments that have glide enabled, or alternatively use sustain for that.
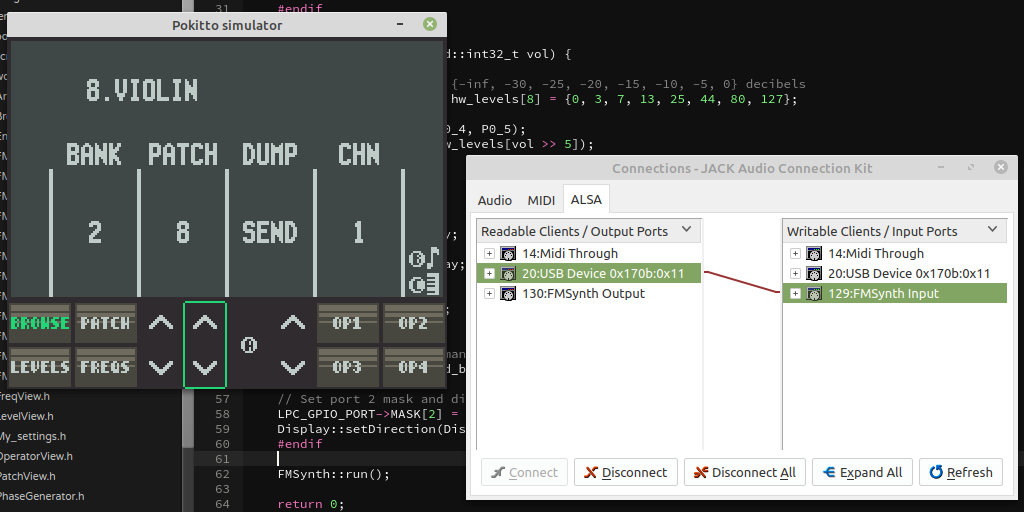
USB MIDI connection
Details
For USB MIDI you need to have Pokitto connected to the computer when the synth starts, and press C when asked to enable USB. It should only take a second or two to establish the connection. MIDI channel on the synth defaults to 1 and can be changed from BROWSE view.
To use a MIDI keyboard, connect it to the computer and route MIDI messges from the keyboard to Pokitto.
You can also play MIDI tracks on a music software and configure it to send MIDI messages to Pokitto. Note that MIDI events that happen at the same time are not sent in any particular order, so a note-on message (for next note) might be sent before a note-off (for previous note). Because the synth can only play 4 notes simultaneusly, you might need to manually add small gaps between adjacent notes.
UI explained
Details
The four buttons at lower left and lower right corners are used to switch between different views. Each view has up to four parameters that can be adjusted using the four up and down arrows in the middle.

BROWSE view: Browse the preset patches, export current patch and set MIDI channel. This is the only view you need, if you don’t plan to make own custom instruments. Currently there are only the built-in patches to choose from, but the current patch can be imported and exported as a MIDI SysEx message. In the future, support for loading and saving patches from and to SD card could be added.
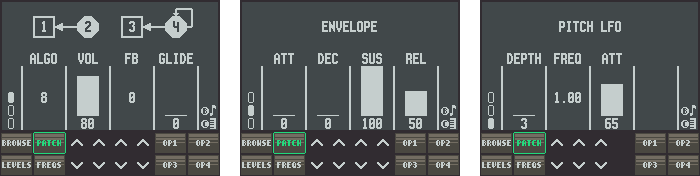
PATCH view: Common settings for the patch. On tab 1 you can change the algorithm, master volume, feedback level for operator 4 and glide rate. The chosen algorithm is show at the top. A number with square around it represents an audible carrier operator, filled octagons are modulators, and arrows show how the operators are routed.
Feedback basically lets you morph the operator output waveform between sine and saw (positive fb) or sine and square (negative fb). High feedback level causes the output to turn into noise, which can also be useful. Glide, when enabled, adds a pitch slide from one note to the next if you play a note before releasing the previous one.
Tab 2 is ADSR envelope settings for the entire patch. Attack, decay and release are durations, so higher attack value means slower attack. On tab 3 are settings for the pitch LFO.
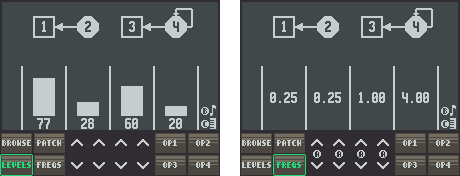
LEVELS and FREQS views: Adjust output levels and frequencies of all operators in one view. Operator frequency can be a ratio of the note beign played or fixed freuency. Fixed/ratio mode can be changed only on the OPERATOR views. Both the ratio and fixed frequency have separate coarse and fine adjustment. Hold down A to change the fine setting.
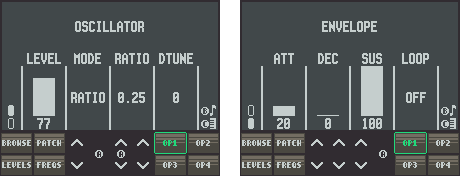
OP1, OP2, OP3 and OP4 views: Detailed settings for each operator. Tab 1 has settings for oscillator level and pitch, and tab 2 has ADS envelope plus loop settings. If loop is enabled, the envelope jumps from decay back to attack stage.
Importing and exporting patches
Details
If you make a custom patch, you might want to save it, so that it won’t disappear when Pokitto is turned off. Or maybe someone has shared an awesome patch and you want to try it. Until a better method is implemented, patches can be transferred as MIDI SysEx messages. To send and receive SysEx messages you need a MIDI monitor program. There are many MIDI monitors for different operating systems, but the instructions below are for amidi on linux.
First to list available MIDI devices:
$ amidi -l
Dir Device    Name
IO  hw:1,0,0  Mbed Audio MIDI 1
To monitor Mbed Audio MIDI 1:
$ amidi -p hw:1,0,0 -dThen grab your Pokitto and select SEND from FMSynth’s BROWSE view. This outputs the following (in hexadecimal):
F0 7D 53 49 4E 45 00 00 00 00 00 00 00 00 00 00 00 00 01 50 32 00 00 00 64 32 00 00 00 64 00 01 00 32 00 00 64 00 00 00 01 00 32 00 00 64 00 00 00 01 00 32 00 00 64 00 00 00 01 00 32 00 00 64 00F0 is a status byte indicating the beginning of a SysEx message and 7D is manufacturer ID for educational and development use. All the rest is simply the contents of FMPatch struct starting with patch name (16 bytes null-terminated string).
To send an exported patch back to the synth:
$ amidi -p hw:1,0,0 -S "F0 7D 53 49 4E 45 00 00 00 00 00 00 00 00 00 00 00 00 01 50 32 00 00 00 64 32 00 00 00 64 00 01 00 32 00 00 64 00 00 00 01 00 32 00 00 64 00 00 00 01 00 32 00 00 64 00 00 00 01 00 32 00 00 64 00 F7"Notice the added F7 at the end. This is a status byte that marks the end of a SysEx message.
Online FM Synthesizers
Details
If you are interested in FM synthesis and creating own patches, you might want to also check out these online synths:
http://www.audiosauna.com/studio/
https://www.webaudiomodules.org/wamsynths/webdx7/
https://www.webaudiomodules.org/wamsynths/dexed
https://www.taktech.org/takm/WebFMSynth/
Most of the preset patches I picked from the webdx7 and tried to replicate them on my synth. Conversion is not straightforward, but it helps to have something to compare with.


 )
)