Introduction to PokittoSim
PokittoSim is a API-level simulation of the Pokitto Application Programming Interface (API) that allows you to try out and develop most* of your Application/Game ideas on a PC.
This means you can write, run and debug your program on a Windows/Linux (Mac coming soon) PC without needing the actual Pokitto itself.
This is what it looks like:
In the simulator buttons are arrow keys + Z,X,C (A,B,C) !!
Tutorial video
")
Why use a simulator?
-
Speed. Developing code just on a PC is much faster than on the actual hardware, because you do not have to copy the code to the Pokitto each time you compile.
-
Easy debugging. Most problems you encounter while developing your program have more to do with mistakes in your own code than anything else. It may be a jumping algorithm for your platform game or something else. On a PC you can perfect your code and then focus on optimizing it for the hardware. All Pokitto core library has actually been developed in this way.
-
No need to have the device at hand. Are you travelling and haven’t got your Pokitto with you? No problem. We have proven time and time again that programs made by talk.pokitto.com users work without changes when moving from simulator to hardware.
How the simulator works
PokittoSim is an API-level simulator. It uses the well-known SDL2 (Simple DirectMedia Layer) library to create a “window” where your code will run almost exactly like it would on the Pokitto hardware (see below).
What actually happens with the simulator is as follows: you write your code inside Code::Blocks, your code gets compiled into a Windows / Linux program (Mac coming soon) and runs as a native Win/Linux program on your PC!
*Difference between a simulator and an emulator
A simulator works by making things work in a similar way (hence the name simulator). Emulator is something that emulates the entire hardware. For example, there are emulators that can run Playstation games on a PC. PokittoSim is a simulator, not an emulator. An emulator for the NXP LPC11U68 chip and all the other components inside Pokitto would have been a humongous task. For the sake of development time, Pokitto is launching with a simulator. It helps you get your work done, but be aware that it can not simulate everything the hardware can. This means things like controlling motors through the Pokitto Extension Header etc.
Who is the simulator intended for?
Installing and using the PokittoSim simulator requires some prior knowledge of programming tools and computers in general. PokittoSim is released now in order to allow the community to begin creating and testing their own ideas. Support for using the simulator at this moment is a bit limited, because we are still busy with fulfilling the Pokitto Kickstarter. Support and tutorials for using the PokittoSim will improve over time.
However, several users with limited experience have already reported successfully installing and running Pokitto programs on the PokittoSim, so don’t be afraid to try. You can’t break anything by trying!
STEP 1: Installation of Code::Blocks environment
Download the free Code::Blocks. Code::Blocks is an IDE. An IDE is like Microsoft Word for programmers. With Word, you write text. With an IDE, you write code. You can learn more at codeblocks.org
Downloading Code::Blocks
All downloadable binary versions
http://www.codeblocks.org/downloads/binaries
Direct link to a trusted Windows binary
This is a direct link to the correct version of the Code::Blocks program (Windows mingw 16.01) coming from a trustworthy site (SourceForge)
I recommend installing Code::Blocks using default settings!
STEP 2: Get the repository from Github
STEP 3: Open project file inside Code::Blocks
Click File-Open in Code::Blocks. Navigate to where you cloned/extracted the PokittoSim repository from Github.
Open file Pokitto_sim.cpb under directory POKITTO_SIM
.cbp files are Code::Blocks project files. They contain the source and settings of an entire project.
Select Windows / Linux target
Next, choose correct target inside Code::Blocks after you have opened the .cbp project file

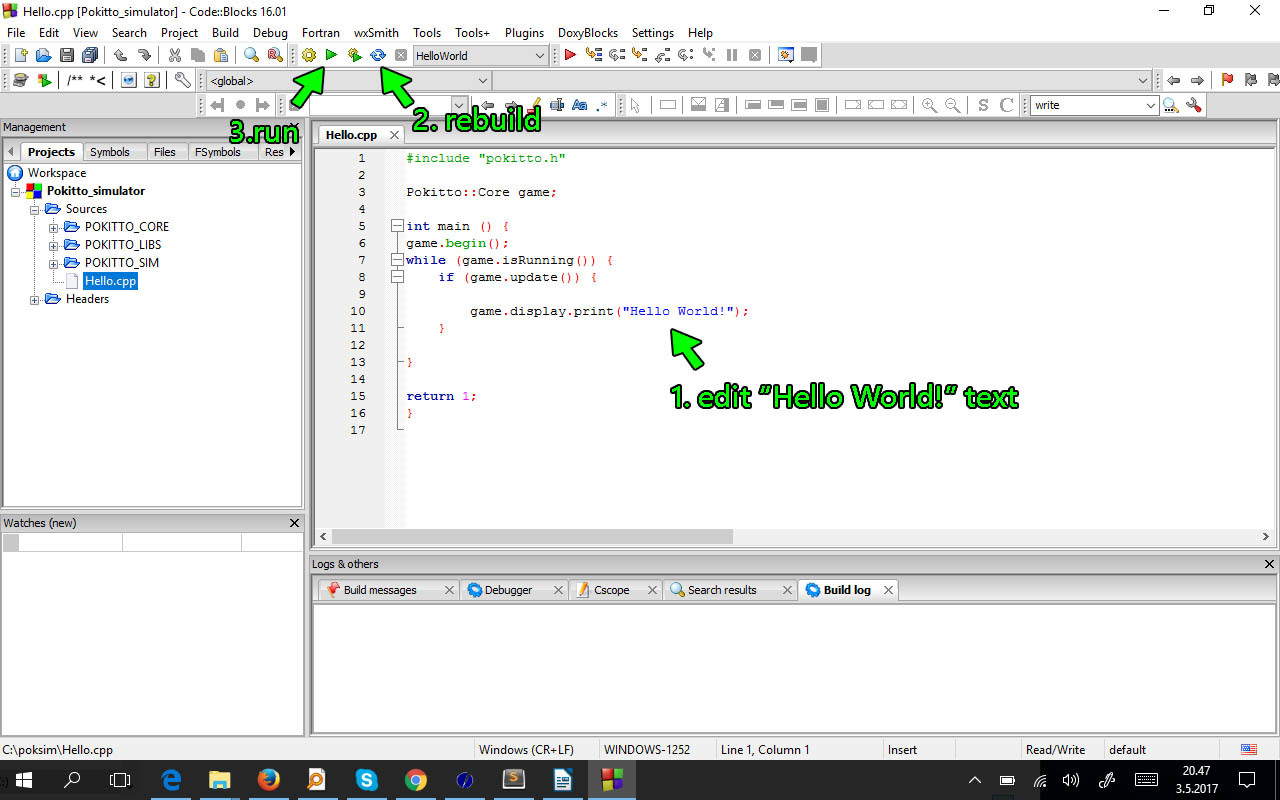
STEP 4: You are ready to run
Now you can change the text “Hello World” to something else, press CTRL-F11 to rebuild and CTRL-F10 to run the program.