Tiles-And-Sprites with User Interface
Current Status
- C++
- API - Done
- Documentation / Guide (this wiki!) - 50ish%
- Example Project - Done - https://github.com/carbonacat/pokitto-tasui-example
- FemtoIDE:
- PokittoLib - TODO
- Example Project integration - TODO
- MicroPython:
- API Bindings - Done
- Examples - Done -> [Wiki] You won't believe until you try it - TASUI
- Documentation - Done
Introduction
TASUI is an extension of TAS, in order to provide Texts & UI rendering facilities, very similar to old FF games, NES & SNES area:
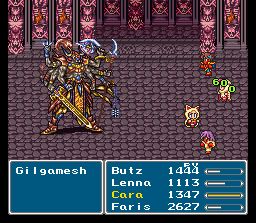
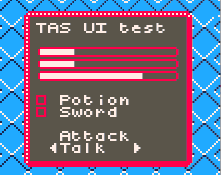
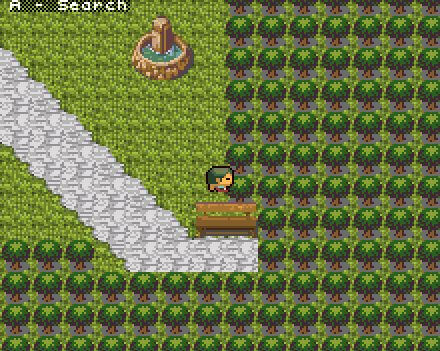
Look at this beautiful battle UI!
I’ll let the API introduce itself since :
![]()
Nice to meet you, I’m Tasui, TAS’ weird cousin!
Where TAS does an amazing job of rendering the Game Elements with his Tiles and Sprites, I, however, am dedicated into rendering the UI and Texts.
If you allow me, that is. If you’d like to, you’ll have to invoke me using the veeeeery complicated ritual of writing my name in your code. After that, I’ll do my best to follow your orders. I’m still inexperienced, so I still got a lot to learn. Don’t hesitate to tell me if anything went wrong!
Oh, by the way, I’m not sick. It’s my natural color.
As a short list, it provides the following:
- An additional UI layer that will be rendered after the Tiles and Sprites, based on a Tilemap itself.
- Monospace, terminal-like text printing (from [SPACE] to [DEL]).
- Box, gauge and symbols rendering (including arrows and checkboxes).
- Switchable tilesets using 6x6 tiles.
- Two recoloration facilities, including a Color LookUp Table and a Color Delta Per Tile.
- Partial transparency support (key color, and empty tiles).
It doesn’t provide the following however:
- Menu system.
- FF-style battle system.
- Window support.
- A perfect UI out-of-the-box.
- Your story.
An important point: it works only with TAS, including its Low Res variant. Trying to compile it with another mode will generate an error.
That’s because it’s a Rendering Library, not a full UI toolkit. You’ll be able to draw/print stuff, but you’ll be responsible for making the menu system, etc.
However, a few examples might help you!

A simple dialog box, using drawBox, printText and drawSymbol.
A quick and dirty transition done using clear, setTileAndDelta and mapColor.
(Top left corner) A hint message made using setCursorDelta, printText and fillRectTile
drawGauge, fillRectDelta, printChar, printSymbol
Getting Started
OK, let’s start by calling our little helper first.
To make sure of that, we’ll add a define in the My_settings.h file:
...
// Enables TASUI.
#define TASUI
...
(Be sure to use either TASMODE or TASMODELOW!)
Then we’ll enable it right away and print some texts to make sure it’s working, in your main.cpp (from the default project):
...
#include <Pokitto.h>
// NEW - Include for the TASUI API.
#include <tasui>
// NEW - Include for the Tileset.
#include <puits_UltimateUtopia.h>
...

int main(){
  ...
  using PB=Pokitto::Buttons;
  // NEW - Convenient alias
  using PUI=Pokitto::UI;
  ...
  PC::begin();
  ...
  // NEW - Select the tileset.
  PUI::setTilesetImage(puits::UltimateUtopia::tileSet);
  // NEW - Show the Tilemap, the Sprites, then the UI.
  PUI::showTileMapSpritesUI();
  // NEW - Print the given string.
  PUI::printString("Hi stranger");

  while( PC::isRunning() ){
  ...
Let’s compile and run …

It’s been a while!
If your screen doesn’t show the message, you probably forgot to use showTileMapSpritesUI();.
If your screen is showing something like this:

!@#$%^&()_+!@#$%*
Then you’re using the secret nullptr tileset. It’s pretty good for a glitchy rendering!
If that wasn’t your intention, you simply forgot to use setTilesetImage.
You don’t need more to have a TASUI setup ready.
Notice the following:
- There are no specific call in the update loop to render the UI.
- The text printing was done outside the update loop.
- The state of the UI is kept until your next call to it.
- This mean, as long as you don’t want to do anything, you needn’t call anything.
The calls will be described later, in their respective section.
The Tilemap & the Coordinates System
TASUI is actually a Tilemap. That means everything rendered, the text, the boxes, etc, are made out of tiles.
Because of that, the coordinate system is a bit different. It works with Columns and Rows:
-
0, 0is mapped to the top-left corner. -
36, 29(or18, 14in lowres) is mapped to the bottom-right corner.
Each time a Column is increased, x advances by 6 pixels (with the default tileset settings).
Each time a Row is increased, y advances by 6 pixels as well.
Because it is a Tilemap, each tile in place won’t change until you call another method. As we saw with the previous example, a single printString outside the main loop modified the Tilemap and the text was left on the screen. The tilemap is never cleared, unless you do it by calling clear yourself (more on that later).
Let’s try the most elementary TASUI call!
API - Pokitto::UI::setTile(col, row, tile) - Change a single tile of TASUI, at the cell col, row.
- Ignored if
col, rowrefer to an invalid cell (e.g. outside the Tilemap).- By the way, every facility are checked for proper coordinates!
  // Set the very first tile to the `A` character
  // Note: Characters are mapped directly to their ASCII code, so you can directly use them as is.
  PUI::setTile(0, 0, 'A');
  // Set the very last tile to the `Z` character.
  PUI::setTile(36, 29, 'Z');
OK, I can see the A, but where is the Z?
The Z tile is partly outside of the screen. That’s because the tileset is using a 6x6 grid, which, unfortunately, isn’t a round divider of the Pokitto’s Screen (220*176).
Can’t do much about that, but fortunately there is a call that does help about this matter.
API - Pokitto::UI::setOffset(x, y) - Changes TASUI’s offset.
- That is, the offset from the origin of TASUI (top/left) to the origin of the Screen.
Let’s try it, with 4 letters at each corner, but without making any of them outside of the screen!
Also, let’s calculate an offset so the UI is centered this way.
Horizontally, we got 37 tiles of 6 pixels each. The screen’s width is 220, which means we have 2 extra pixels (220 - 376 = -2).
Vertically, we got 37 tiles of 6 pixels each. The screen’s width is 176, which means we have 4 extra pixel (176 - 630 = -4).
By centering, we want to make sure that there are as many extra pixel from left/top and right/bottom.
  // TASUI will draw the UI, starting from `-1, -2`.
  PUI::setOffset(-1, -2);
  PUI::setTile(1, 1, 'A');
  PUI::setTile(35, 1, 'Z');
  PUI::setTile(1, 28, 'A');
  PUI::setTile(35, 28, 'Z');
Do we want to show XYZ well aligned on the bottom right? It’s as easy:
  // TASUI will draw the UI, starting from `-2, -4`.
  PUI::setOffset(-2, -4);
  // We're using the last row (#29), up to the last column (#36) this time.
  PUI::setTile(34, 29, 'X');
  PUI::setTile(35, 29, 'Y');
  PUI::setTile(36, 29, 'Z');
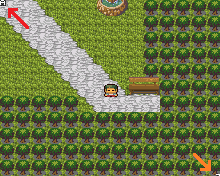
Let’s try something more interesting by moving setOffset into the main loop, and using a tiny random value:
  PUI::setTile(1, 1, 'A');
  PUI::setTile(35, 1, 'Z');
  PUI::setTile(1, 28, 'A');
  PUI::setTile(35, 28, 'Z');

  ...
  while (PC::isRunning()) {
    ...
    // X goes from -2 to 0 (centered on -1).
    // Y goes from -4 to 0 (centered on -2).
    PUI::setOffset(-2 + rand() % 3, -4 + rand() % 5);
  }
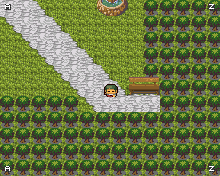


Properly aligned letters. Shake it, baby!
Why you would need a shaking UI is left as an exercise for the reader.
Basic Tilemap Calls
We’ve seen setTile so far, let’s see its close family!
API -Pokitto::UI::getTile(col, row) - Retrieves the tile at col, row from the UI Tilemap and returns it.
- Returns 0 when outside.
- Probably won’t be as useful as the other ones … but being able to read the Tilemap means you can do interesting effects to it (e.g. by randomly changing tile to +1/-1 in order to “glitch” it!)
PUI::setTile(10, 10, 'a'); PUI::getTile(10, 10) == 'a';
API -Pokitto::UI::clear() - Clears the whole Tilemap with the empty tile (0).
- Extremely useful for obvious reasons.
- Since the Tilemap is never reset at each frame, you’ll probably have to call this often.
API -Pokitto::UI::clear(tile) - Clears the whole Tilemap with tile.
- Same as above, but you can use a given tile this time.
PUI::clear('A'); // Covers the screen with AAAAAAAAAAAAAAAAAA
API - Pokitto::UI::fillRectTiles(firstCol, firstRow, lastCol, lastRow, tile) - Paints a rectangular area of the Tilemap with tile.
- Pretty much the same than
clear(tile), but constrained to an area. - It’s also useful to draw vertical and horizontal lines of tiles.
Let’s have a single example that covers all of them:
  // Centering TASUI.
  PUI::setOffset(-1, -2);
  // Filling the screen with A.
  PUI::clear('A');
  // Carving a rectangle of spaces.
  PUI::fillRectTiles(2, 2, 34, 27, ' ');
  // Copying the tile from `0, 0` into `18, 15`.
  PUI::setTile(18, 15, PUI::getTile(0, 0));

“The Scapegoat was one of us”, circa 2020
Text Printing 101
OK, after printing text using setTile, it’s time to move on to something more easy to use.
API - Pokitto::UI::printChar(c) - Prints c at the current cursor position.
- Newlines (
\n) and tabs (\t) are interpreted as such. - Automatically insert a newline when reaching the last column (aka the right border)
- Any other control characters are ignored otherwise.
No row/columns? That’s because all the text-based calls rely on an internal cursor, which is advanced each time a text-based call is made:
API - Pokitto::UI::setCursor(col, row) - Changes the cursor’s position.
- Cursor’s position is constraint to the Cursor Bounding Box.
API - Pokitto::UI::cursorColumn() - Returns the cursor’s column.
API - Pokitto::UI::cursorRow() - Returns the cursor’s row.
We already had a teasing of printString before, let’s focus on it:
API - Pokitto::UI::printString(zString) - Prints zString at the current cursor position.
- Internally uses
printChar. - Stops at
zString's first nul character.
API - Pokitto::UI::printString(zString, limit) - Prints at most limit character from zString at the current cursor position.
There is also a way to print integers in decimal, binary, octal and hexadecimal formats with padding if needed:
API - Pokitto::UI::printInteger(value) - Prints value in decimal format.
API - Pokitto::UI::printInteger(value, padding) - Prints value in decimal format. Will print at least padding characters, using space as the padding character if needed.
API - Pokitto::UI::printInteger(value, padding, paddingCharacter) - Prints value in decimal format, with padding. paddingCharacter is used when having to pad.
API - Pokitto::UI::printInteger(value, padding, paddingCharacter, radix) - Prints value with padding and in the specified radix.
-
radix=2will print binary. -
radix=8will print octal. -
radix=10will print decimal. -
radix=16will print hexadecimal.
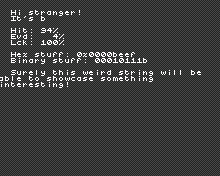
An example will be more useful, as usual:
  // Centering TASUI.
  PUI::setOffset(-1, -2);
  // Filling the screen with spaces.
  PUI::clear(' ');

  // Starts from 2, 2
  PUI::setCursor(2, 2);
  // Prints some string.
  PUI::printString("Hi stranger!");
  // Starts from 2, 2
  PUI::setCursor(2, 3);
  // Actually prints "It's b".
  PUI::printString("It's been a while", 6);

  PUI::setCursor(2, 5);
  PUI::printString("Hit: ");
  PUI::printInteger(94);
  // Prints a single character, in case this wasn't obvious.
  PUI::printChar('%');

  PUI::setCursor(2, 6);
  PUI::printString("Evd: ");
  PUI::printInteger(4, 3, ' ');
  PUI::printChar('%');

  PUI::setCursor(2, 7);
  PUI::printString("Lck: ");
  PUI::printInteger(100, 3, ' ');
  PUI::printChar('%');

  PUI::setCursor(2, 9);
  PUI::printString("Hex stuff: 0x");
  PUI::printInteger(0xbeef, 8, '0', 16);

  PUI::setCursor(2, 10);
  PUI::printString("Binary stuff: ");
  PUI::printInteger(0x17, 8, '0', 2);
  PUI::printChar('b');

  // Printing a very long string to show the auto newline.
  PUI::setCursor(2, 12);
  PUI::printString("Surely this weird string will be able to showcase something interesting!");
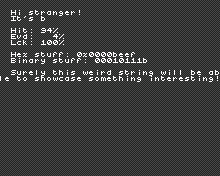
You don’t have any left excuses for not doing a stat screen in your Pokitto RPG now.
printInteger is easy to use in this form, and the padding allows aligning things more easily.
Let’s take note of a few things:
- A newline was automatically generated.
-
ableis cut in half. - The newline put back the cursor to the column #0.
Let’s replace the last line’s printString with printText:
PUI::printText("Surely this weird string will be able to showcase something interesting!");
Able not cut in half anymore!.. but still stuck to the left…
printText is an interesting variant of printString:
API - Pokitto::UI::printText(zString) - Prints zString at the current cursor position, with efforts to not cut words in half.
- Internally uses
printChar. - Stops at
zString's first NUL character.
API - Pokitto::UI::printText(zString, limit) - Prints at most limit character from zString at the current cursor position, with efforts to not cut words in half.
-
limitapplies on the printed characters, not on the length ofzString.
As for the newline’s new position, we’ll see that in a later section.
TODO - Widgets
- TODO: drawBox
- TODO: drawGauge
- TODO: drawSymbol & ptui::Symbol, printSymbol too
- TODO: Link to the relevant demo file(s)
TODO - Shifting & AutoScroll
- TODO: shift
- TODO: shift -area version
- TODO: setCursorBoundingBox & resetCursorBoundingBox
- TODO: Link to the relevant demo file(s)
TODO - Recoloring the whole Tilemap
- TODO: CLUT explanation
- TODO: mapColor
- TODO: resetColor
- TODO: Screenshots are needed!
- TODO: Tell why it’s great when for using arbitrary colors
- TODO: Tell basic color map for Ultimate Utopia TS
- TODO: Link to the relevant demo file(s)
(Image of Tasui with more interesting colors)
TODO - Recoloring a single Tile with Color Delta
![]()
I recolored myself like the Color Delta would!
- TODO: Tells it’s essentially the same than Sprite & Tiles’ color field.
- TODO: setDelta, fillDelta, fillRectDeltas, + TileAndDelta variants.
- TODO: Show the basic
- TODO: Tell about how limited it is alone.
- TODO: Link to the relevant demo file(s)
TODO - Combining Both Recoloration
- TODO: Full demo of both.
- TODO: “it’s awesome and you should try it”
- TODO: more screenshots
- TODO: Link to the relevant demo file(s)
Provided Tilesets
You can find them all in the Pokitto Library (https://github.com/pokitto/PokittoLib/tree/master/Pokitto/POKITTO_LIBS/PokittoTUI/UITILESETS).
To use one of them, you have to include the said file and to call setTileset() with its tileset image.
...
#include <puits_UltimateUtopia.h>
...
int main(){
  ...
  using PUI=Pokitto::UI;
  ...
  // Standard tilesets are in the `puits` namespace, and the tileset image defined inside the `tileset` field.
  PUI::setTileset(puits::UltimateUtopia::tileSet);

}
-
puits_UltimateUtopia.h- A FF themed theme, which use 8 colors, very suitable for recoloration and interesting effects. - TODO: Link to the relevant demo file(s)
TODO - Advanced - Text Tricks
- TODO: Dialog demo with auto scroll!
- TODO: Crap I forgot to include an API in ptui::UI to retrieve the current cursor’s position
- TODO: Link to the relevant demo file(s)
TODO - Advanced - Recoloration Tricks
- TODO: Text with transparent BG
- TODO: Pseudo-half transparency trick by swapping 2 colors each frame (probably visible only on the pokitto?) (might fail hardly tho with the lack of v-sync)
- TODO: half-transparent bg for softer UI
- TODO: Link to the relevant demo file(s)
TODO - Advanced - Layers
- TODO: showTilemapUISprites
- TODO: hide
- TODO: showOnTop
- TODO: Link to the relevant demo file(s)
TODO - Advanced - getTile
- TODO: getTile
- TODO: Silly UI platform game
- TODO: Link to the relevant demo file(s)
TODO - Advanced - Configuration, The Return
- TODO: TASUI_COLUMNS
- TODO: TASUI_ROWS
- TODO: TASUI_TILE_RANSPARENCY
- TODO: TASUI_CLUT
- TODO: TASUI_TILE_DELTA
- TODO: Show perfs table + RAM consumption
Advanced - Creating your own Tileset
Default tilesets can get pretty boring. How about creating a new one instead?
The format must respect the following constraints:
- Each tile must be 6x6 pixels, 8bpp.
- All the tiles must be stacked vertically (so the default ones are 8x768 pixels).
- One pixel takes 1 byte in the image data, and the size header (first 2 bytes meaning width/height) is NOT to be provided.
- The indexes of tiles have the following meaning (by index - 0 is first, 127 is the 128th):
-
0- Empty tile. The very first tile is always ignored - thus it’s best to leave it fully transparent. -
1- Right Arrow (ptui::Symbol::left). -
2- Left Arrow (ptui::Symbol::right). -
3- Up Arrow (ptui::Symbol::up). -
4- Down Arrow (ptui::Symbol::down). -
5to9- Left part of the gauge, filled from 0% (5) to 100% (9). -
10to16- Middle part of the gauge, filled from 0% (10) to 100% (16). -
17to21- Right part of the gauge, filled from 0% (17) to 100% (21). -
23- Unchecked Checkbox (ptui::Symbol::unchecked). -
24- Checked Checkbox (ptui::Symbol::checked). -
25to31- Box borders, clockwise, starting from the top-left corner. -
32- Both the Space character, and Box’s insides. -
33to126- All the printable ASCII characters. -
127- A cross inside a disk.
-
Once you have this image, it’s getting a bit more complicated, because there is a lack of dedicated tooling.
I’m doing the following myself:
- Ensure the Tileset Image use the Miloslav palette.
- Use a FemtoIDE project with Miloslav palette.
- Drop the Tileset Image there.
- Compile the project.
- Extract the generated
TilesetImage.h(if your tileset image’s filename wasTilesetImage.png) to retrieve all the bytes, except for the first 2 (width/height), and use those as the new tileset image data.
If you didn’t understand, just send me your tileset and I’ll convert it. Just be aware that your palette might be different tho!
Advanced - Making a Recolorable Tileset
Recolorable Tilesets works best using both CLUT and the Color Delta.
Making a recolorable tileset means you want to use a few number of colors, like the standard Ultimate Utopia does (8 colors, indexed from 0 to 7).
The recoloration works best by using a multiple of your tileset’s colors range.
- Using a 8-colors tileset means you’ll have as much as 32 tilset palettes.
- Using a 16-colors tileset means you’ll have as much as 16 tileset palettes.
- Using a 128-colors tileset means you’ll have as much as 2 tileset palettes.
Ultimate Utopia’s include file describes how are mapped its colors:
- 8 colors.
- index 0 is outside the box.
- indexes 1 and 2 are a checkerboard-pattern background for inside the box, and also under symbols/gauges.
- indexes 3, 4 and 5 are used for the borders and the gauge.
- index 7 is used for the text and the symbols’ main color. (arrow, checkbox, gauge filling)
- index 6 is used for for the symbols’ secondary color. (arrow, checkbox, gauge filling)
- index 6 is used for for the symbols’ tiercary color. (gauge only)
By doing careful color mapping, you can have a few interesting effects (see the Advanced Recoloration Tricks), such as:
- Text without background
- Pseudo-half transparent background
- Gauges with different colors for different parts
It’s all a design choice in the end, of course. You might be fine with a 128-colors vibrant tileset with only two variants, after all.
Please remember that using the following:
- CLUT
- High color number
- High color delta
might result in a overflow. It won’t crash your game, but it’ll show weird colors you can’t exactly control. It’s far less cool than thenullptrtileset in my opinion.
FAQ
I get garbage tiles instead of a proper text!
You probably forgot to call setTilesetImage() with the right tileset!
I get a compilation error after adding the
#define TASUIin myMy_settings.h.
TASUI works only with the TAS mode. So you must enable such a mode before!
Can I use a Tileset with a different size of tile (instead of the 6x6 ones)
Short answer: You cannot with TASUI alone. The code and the provided tilesets are made to be using 6x6 tiles, and it’d take a lot of work to support other sizes as well. TASUI is supposed to be a simple way to get a UI in TAS.
Long answer: You can, but you have to recreate the TASUI configuration before. Be warned it’s going to take a lot of time to create a proper tileset, and to make sure things work out! Definitely not recommended for a Jam. Also you’ll have to deal with LineFillers, which are a undocumented feature of TAS.
It’s probably best to spend your time doing something else!
Can I use font XXX?
If you create a new tileset, you can have a new font. However please remember the following limitations:
- Every character will ALWAYS take a tile.
- That means
iiiandmmmwill always take the same width - like a monospace font would. - That also means you cannot have different fonts within the same TASUI.
- Line height is fixed as well, and depends on the Tileset’s height of course.
Conclusion
That’s all! I hope this was useful for you.
![]()
(Who needs arms when you got a good UI anyway) See you!
Additional resources
- Example project “TP quest” - https://github.com/carbonacat/pokitto-tasui-example
- MP Example Project - https://talk.pokitto.com/uploads/short-url/wDlAcCLE4IG5StzcNMfDiBwsKJw.zip