[Tutorial][Community]Pipes Part 2

Recap

In the last article we put together the framework for retrieving our puzzle from memory, populating our multidimensional array and rendering the puzzle on the screen.

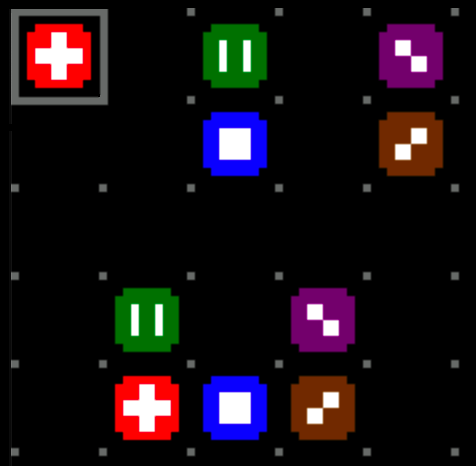
In this tutorial we will concentrate on the actual game play itself – still in the confines of a puzzle that is 5 x 5 cells however we start to add functionality that will allow us to move to large puzzles later. The play logic consists of two distinct modes – selecting a node and then laying pipe.

The sample code detailed in this article can be found in the repository at https://github.com/filmote/Pipes_Article2_Pokitto. The game is playable now but only with the first puzzle as it is hardcoded in the setup() routine.

Structures

Before diving into the first game playing mode, I want to draw your attention to a number of
data structures that I have defined to capture game play information. If you aren’t familiar with structures refer to the accompanying article Structures.

The first, Node, represents a node in the puzzle and contains three variables that hold the coordinates and cell value respectively. The second, Player, uses this new data type to capture the player’s game state including the selected node and highlighted node.

The final structure holds the current puzzle details including the puzzle number being played, the game’s dimensions - represented as a Node so we have width (x) and depth (y) dimensions – and the puzzle board itself. As development of the game continues we will add additional details to this structure to hold the current level and offset information to render the board centrally in the screen. For the moment it only has three members.

struct Node {
  uint8_t x;
  uint8_t y;
  uint8_t value;
};

struct Player {
  Node highlightedNode;
  Node selectedNode;
}
player;

struct Puzzle {
  uint8_t index;           
  Node maximum;         
  uint8_t board[9][9];     
}
puzzle;

Game Play


Game play consists of three different modes –

  • game initialization
  • node selection
  • laying pipe

The following sections describe each of the modes. As the user selects nodes or completes the laying of pipe, the code transitions from one mode (or state) to another via the main loop(). As shown below, the current mode is stored in the gameState variable and this controls the flow of the application.

void Game::loop() {
    
  PC::buttons.pollButtons();

  switch (gameState) {

    …

    case STATE_INIT_GAME:
      play_InitGame();
      [[fallthrough]]

    case STATE_NO_SELECTION:
      play_NoSelection();
      break;

    case STATE_NODE_SELECTED:
      play_NodeSelected();
      break;

    …

  }

}

Mode One: Game Initialization


The setup() method has also been modified and I have hard-coded the puzzle number and dimensions of the first puzzle. Before exiting the procedure, the gameState variable that controls the overall operation of the game is updated STATE_NO_SELECTION to progress it immediately to the game mode where the user has yet to select a node.

If you refer back loop() code above, you will notice that the case for the game initialisation does not break but rather uses the compiler directive [[fallthrough]]. Normally, each case clause in a switch is terminated by a break statement thus telling the code to complete execution and to move to the next statement after the switch. Using the [[fallthrough]] directive allows code to immediately execute the STATE_NO_SELECTION clause when it has finished initializing the game in the previous clause.

void Game::play_InitGame() {

  puzzle.index = 0;
  puzzle.maximum.x = 5;
  puzzle.maximum.y = 5;
  
  initBoard(puzzle.index);
  
  gameState = STATE_NO_SELECTION;

}

Mode Two: Node Selection

Navigating around the board.


In the last article, we looked at a function to render the board based on a populated puzzle. If you recall, it rendered the pipes and the grid markers for the board. I have added the code below to highlight the player’s selected cell by simply drawing a square.

Img1

void renderBoard() { 

  ...

  PD::drawRect(player.highlightedNode.x * GRID_WIDTH, 
               player.highlightedNode.y * GRID_HEIGHT, 
               GRID_WIDTH, GRID_HEIGHT);
    
}

When selecting a node, the user can scroll anywhere within the confines of the board. The following code tests whether the player has pressed any of the four directional buttons and if the move is valid. If so, the x or y coordinates are altered and the board rendered again.
void play_NoSelection() {

  if (PC::buttons.pressed(BTN_LEFT) && player.highlightedNode.x > 0) {  
    player.highlightedNode.x--; 
  }
  if (PC::buttons.pressed(BTN_RIGHT) && player.highlightedNode.x < puzzle.maximum.x - 1) {
    player.highlightedNode.x++; 
  }
  if (PC::buttons.pressed(BTN_UP) && player.highlightedNode.y > 0) {
    player.highlightedNode.y--; 
  }
  if (PC::buttons.pressed(BTN_DOWN) && player.highlightedNode.y < puzzle.maximum.y - 1) {
    player.highlightedNode.y++; 
  }
  ...

  renderBoard();
  
}

Selecting a Node.


After navigating around the board, the player can do one of two things – select a node that has never been played before or select a node that already has pipe connected to it. The play handling code in the previous section handles the pressing of the ‘A’ button and handles these two scenarios.

void play_NoSelection() {

  ...
  if (PC::buttons.pressed(BTN_A) && isNode(player.highlightedNode.x, 
                                           player.highlightedNode.y)) {

A new function, nodeAlreadyPlayed(), tests to see if the node has already been played and if so clears the board of the previously laid pipe for the selected node. It then copies the selected nodes value and coordinates into the player.highlightNode structure.

    if (nodeAlreadyPlayed(getNodeValue(player.highlightedNode.x, player.highlightedNode.y))){

      clearBoard(getNodeValue(player.highlightedNode.x, player.highlightedNode.y));
      player.selectedNode.value = getNodeValue(player.highlightedNode.x, 
                                               player.highlightedNode.y);
      player.selectedNode.x = player.highlightedNode.x;
      player.selectedNode.y = player.highlightedNode.y;
      gameState = STATE_NODE_SELECTED;

    }
    else {

If the node has not been played before, the selected nodes value and coordinates into the player.highlightNode structure.


      player.selectedNode.value = getNodeValue(player.highlightedNode.x,
                                               player.highlightedNode.y);
      player.selectedNode.x = player.highlightedNode.x;
      player.selectedNode.y = player.highlightedNode.y;
      gameState = STATE_NODE_SELECTED;

    }

  }

  renderBoard();
  
}

After a node is selected, the game state is changed to STATE_NODE_SELECTED and the board rendered. In a later article, we will add some additional code to allow the user to abort the game by pressing the ‘B’ button.

Mode Three: Laying Pipe

Pipe Images


After selecting a node, the player can then lay the pipe between it and the corresponding node. Unlike the node selection mode, the player can only navigate between the nodes using the blank cells of the puzzle. The pipes cannot cross each other or touch other nodes. The player can backtrack on the pipe they are currently laying and this feature has resulted in a lot of code.

But before we get to that code, let’s look at the graphics for the pipes.

The pipe sprites are shown below. You may have noticed that they are 12 pixels by 12 pixels which allows us to join the nodes together properly by taking into account the additional padding the grid places around the 8 x 8 node.

Img2 Img3 Img4

Recording Pipe Details


The six images above are all that is required to draw the pipes on screen. However, to allow the player to backtrack on pipes they have just laid we need to introduce the concept of direction. The constants below expand the six images into twelve by adding a direction indicator. For example, the horizontal pipe has a left to right variant, CONNECTOR_HORIZONTAL_LR, and a right to left variant, CONNECTOR_HORIZONTAL_RL. Likewise, the corner or elbow images have variants detailing from which side they entered and then left.

#define NOTHING                           0
#define CONNECTOR_HORIZONTAL_LR           1
#define CONNECTOR_HORIZONTAL_RL           2
#define CONNECTOR_VERTICAL_TB             3
#define CONNECTOR_VERTICAL_BT             4
#define CONNECTOR_CORNER_TL               5
#define CONNECTOR_CORNER_LT               6
#define CONNECTOR_CORNER_TR               7
#define CONNECTOR_CORNER_RT               8
#define CONNECTOR_CORNER_BL               9
#define CONNECTOR_CORNER_LB               10
#define CONNECTOR_CORNER_BR               11
#define CONNECTOR_CORNER_RB               12
#define NODE                              15

These constants are then used as indices in an array of pipes as shown below. We looked at pointer arrays in the previous article when constructing the node array. You may also have noticed that each image is included in the array twice – once for each direction.

const uint8_t* connectors[13] = { Connector_Nothing, Connector_Horizontal, 
                                  Connector_Horizontal, Connector_Vertical, 
                                  Connector_Vertical, Connector_Corner_TL, 
                                  Connector_Corner_TL, Connector_Corner_TR, 
                                  Connector_Corner_TR, Connector_Corner_BL, 
                                  Connector_Corner_BL, Connector_Corner_BR, 
                                  Connector_Corner_BR};

So how do we record the player’s pipe laying?

In the previous article, we used the initBoard() function to read a nominated puzzle from the PROGMEM into our multidimensional array. We then used the renderBoard() function to display the board. The array and output is shown below. Notice that the node numbers have been logically ORed with the value 0xF0 to produce values such as 0xF1, 0xF2 and so on. This is allows us to determine that the cell is a node (‘F’) and its value.

Img5

If the player then moves right, the highlightNode.x value is increased by one and the underlying board[][] array is updated with 0x11. This is made up from the constant CONNECTOR_HORIZONTAL_LR and the node value of the selected node, 1. This indicates that the player moved from the left to the right to get to the position they are now in. After rendering the board, the pipe is shown horizontal.


Img6

The player moves right a second time and the board and highlight are updated as in the previous step. The board[][] array is updated again and the screen is rendered.

image

This time the player clicks the down arrow. The second horizontal pipe laid in the last step must be changed to an elbow that indicates that the pipe was laid from the left to the bottom of the cell – the cell is updated with the constant CONNECTOR_CORNER_LB (Decimal 10 or hex 0xA) and the selected node value, 1. The new pipe is also recorded in the board[][] array.


Img7

The same thing happens again when the player clicks the right arrow. The vertical pipe laid in the last step must be changed to an elbow that indicates that the pipe was laid from the top to the right of the cell – the cell is updated with the constant CONNECTOR_CORNER_TR (0x7) and the selected node value, 1. The new pipe is also recorded in the board[][] array.


Img9

The following four functions use bit manipulation to determine whether a cell is a node or a pipe and what its value is.

bool isNode(uint8_t x, uint8_t y) {

  return (puzzle.board[y][x] & 0xF0) == 0xF0;
  
}

uint8_t getNodeValue(uint8_t x, uint8_t y) {
  
  return (puzzle.board[y][x] & 0x0F);

}

bool isPipe(uint8_t x, uint8_t y) {

  return (puzzle.board[y][x] & 0xF0) > 0x00 && 
         (puzzle.board[y][x] & 0xF0) != 0xF0;
  
}

uint8_t getPipeValue(uint8_t x, uint8_t y) {
  
  return (puzzle.board[y][x] & 0xF0) >> 4;

}

The following function tests the board to see if a node has been played (ie. has piped laid from it to its corresponding node) by looking for any cell that is not a node but has a corresponding value.

bool nodeAlreadyPlayed(uint8_t value) { 

  for (uint8_t y = 0; y < puzzle.maximum.y; y++) {
    
    for (uint8_t x = 0; x < puzzle.maximum.x; x++) {
      
      if (getNodeValue(x, y) == value && !isNode(x, y)) {
        
        return true;
        
      }
      
    }
      
  }
    
  return false;
    
}

The pipe laid between two nodes can be cleared by looking for cells that have the nominated value but are not nodes.

void clearBoard(uint8_t nodeValue) {

  for (uint8_t y = 0; y < puzzle.maximum.y; y++) {
    
    for (uint8_t x = 0; x < puzzle.maximum.x; x++) {
      
      if (getNodeValue(x, y) == nodeValue && !isNode(x, y)) {
        
        puzzle.board[y][x] = NOTHING;
        
      }
      
    }
    
  }
  
}

Valid Moves


After selecting a node, the player can simply move anywhere there is a blank cell or onto the matching node. As mentioned before, what complicates this is that the player can backtrack on the pipe they are currently laying.

The code below determines whether a particular move is valid. It accepts the parameters including the direction of travel (enumerated by constants), the node originally selected and the coordinates we wish to move to. Before any other tests, the code tests to ensure that the chosen play is still within the confines of the board – if not the function returns a false.

bool validMove(uint8_t direction, Node selectedNode, char x, char y) {

  
  // Off the grid!

  if (x < 0 || x >= puzzle.maximum.x || y < 0 || y >= puzzle.maximum.y) 
    return false;

Next the function determines whether the cell nominated is empty or the corresponding node to the one selected. If either case is true, the function returns a true.

  // Is it a clear cell or the matching node?
  
  if (
      (!isNode(x,y) && getPipeValue(x,y) == NOTHING) ||
      (isNode(x,y) && getNodeValue(x,y) == selectedNode.value && 
      (x != selectedNode.x || y != selectedNode.y))
     ) return true;

Finally, if the move hasn’t been ruled out so far we test to see if the move is actually one where the player is turning back on the pipe he has just laid. This is determined by checking the supplied direction against the cell we are about to move into. For example, if the player has pressed the ‘UP’ button and the position they are planning to move to indicates a move from either the top, left or right to the bottom of the square then we are backtracking - likewise for the other directions.

  // Is the pipe turning back on itself?

  switch (direction) {

    case (UP):
    
     switch (getPipeValue(player.highlightedNode.x, player.highlightedNode.y)) {
 
        case CONNECTOR_VERTICAL_TB:
        case CONNECTOR_CORNER_RB:
        case CONNECTOR_CORNER_LB:
          return true;

     }

     break;
      
    case (DOWN):      ...
    case (LEFT):      ...
    case (RIGHT):     ...

  }
  
  return false;
  
}

The previous function are all we need to complete the second mode of the game, laying pipe between nodes. The full code is a large case statement that handles navigation in all four directions – I have only included the code that handles the left button press.

void play_NodeSelected() {

  if (PC::buttons.pressed(BTN_LEFT)) {
    
    if (validMove(LEFT, player.selectedNode, 
                        player.highlightedNode.x - 1, player.highlightedNode.y)) {

If the player has pressed the left button and it is a valid move then we must handle the rendering of the new pipe based on the previous pipe. In this way we can change straight pipes to curved elbows as necessary or handle the user backtracking on tiles they have just laid.

      switch (getPipeValue(player.highlightedNode.x, player.highlightedNode.y)) {

If the player has pressed left and the previously laid pipe was from the right, then we are backtracking on pipe. The updatePipeWhenReversing() function reverts the previously laid pipe to a straight one if necessary. No new pipe is laid.

        case CONNECTOR_HORIZONTAL_LR:
        case CONNECTOR_CORNER_TR:
        case CONNECTOR_CORNER_BR:
          updatePipeWhenReversing(player.highlightedNode.x - 1, player.highlightedNode.y);
          setCellValue(player.highlightedNode.x, player.highlightedNode.y, NOTHING, NOTHING);
          break;

If we are continuing from the left, there is no need to update the previously laid pipe and we laid a new horizontal pipe.

        case CONNECTOR_HORIZONTAL_RL:
        case CONNECTOR_CORNER_TL:
        case CONNECTOR_CORNER_BL:
          if (!isNode(player.highlightedNode.x - 1, player.highlightedNode.y)) {
            setCellValue(player.highlightedNode.x - 1, player.highlightedNode.y, 
                         CONNECTOR_HORIZONTAL_RL, player.selectedNode.value); 
          }
          break;

If we are have changed from an upward or downward movement to the left, the previous pipe is converted to an elbow that exits to the left and we lay a new horizontal pipe.

        case CONNECTOR_CORNER_LT:
        case CONNECTOR_CORNER_RT:
        case CONNECTOR_VERTICAL_BT:
          if (!isNode(player.highlightedNode.x - 1, player.highlightedNode.y)) {
            setCellValue(player.highlightedNode.x - 1, player.highlightedNode.y, 
                         CONNECTOR_HORIZONTAL_RL, player.selectedNode.value); 
          }
          setCellValue(player.highlightedNode.x, player.highlightedNode.y, 
                       CONNECTOR_CORNER_BL, player.selectedNode.value);
          break;

        case CONNECTOR_CORNER_LB:
        case CONNECTOR_CORNER_RB:
        case CONNECTOR_VERTICAL_TB:
          if (!isNode(player.highlightedNode.x - 1, player.highlightedNode.y)) {
            setCellValue(player.highlightedNode.x - 1, player.highlightedNode.y, 
                         CONNECTOR_HORIZONTAL_RL, player.selectedNode.value); 
          }
          setCellValue(player.highlightedNode.x, player.highlightedNode.y, 
                       CONNECTOR_CORNER_TL, player.selectedNode.value);
          break;

If the previous cell was a node (the starting node) then we simply lay a horizontal pipe.

        case NODE:
          setCellValue(player.highlightedNode.x - 1, player.highlightedNode.y, 
                       CONNECTOR_HORIZONTAL_RL, player.selectedNode.value);
          break;

      }

If we are about to move onto a matching node to the one we have previously selected then the pipe has been successfully completed. Game play reverts to the first mode STATE_NO_SELECTION unless all of the pipes have been successfully completed, at which point the game concludes.

      if (isNode(player.highlightedNode.x - 1, player.highlightedNode.y) &&
          getNodeValue(player.highlightedNode.x - 1, player.highlightedNode.y) == 
          player.selectedNode.value) {
    
        clearSelection();
        gameState = STATE_NO_SELECTION;
 

        // Is the level finished ?

        if (isPuzzleComplete()) {

          gameState = STATE_GAME_OVER;
    
        }
                 
      }  
      
      player.highlightedNode.x--;
      
    }
    
  }

A variation of the above code is repeated for the remaining three directions.

  if (PC::buttons.pressed(BTN_RIGHT)) { ...

  if (PC::buttons.pressed(BTN_UP)) { ...

  if (PC::buttons.pressed(BTN_DOWN)) { ...

  RenderBoard();

}

Next Article

In the next article, we will add a level selection dialogue and add some harder puzzles.

1 Like