A tutorial of how to make a simple game in Python: “Frogitto”
This tutorial goes through the source code needed for making a Python game for Pokitto. The game can be made using a C++ development environment for maximum control, but the easiest and fastest way is to use the Python Editor: https://pyinsky.herokuapp.com/
Pokitto uses Micro Python, which is the Python implementation for MCU devices.
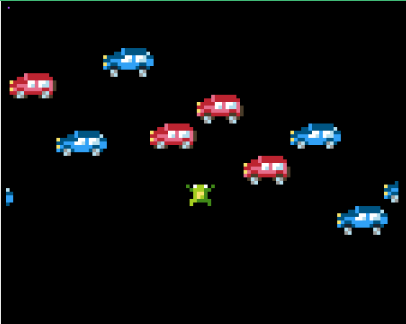
The aim of the game is to guide the little frog cross the road to the top of the screen. If the car hits the frog, it must start all over from the bottom of the screen.
The game consists of three files:
- The
main.pyfile will contain the game code. - The
graphics_data.pywill contain the bitmaps. - The
sprite.pyfile contains the predefined sprite classes.
The main.py file explained
At the start of a python program, we have to import all the modules we are going to use. The upygame module contains a gaming API. It makes possible e.g. to draw a bitmap on the screen. The urandom module contains the random number generator. The graphics_data is our own module for the bitmap data. The sprite module contains the classes for drawing sprites.
import upygame as pygame
import urandom as random
import graphics_data as spritedata
import sprite
Initialize the display
The display class must always be initialized. The palette is set for the whole game. The palette values are 16 bit color values.
pygame.display.init()
pygame.display.set_palette_16bit([
    0, 6438, 18917, 10825, 47398, 688, 41764, 17475,
    58225, 13598, 60486, 40179, 42596, 46845, 63245, 65535
]);
The screen surface (i.e. bitmap) is returned after setting the display mode. In the online Pokitto Editor, there is only one, default, display mode: 110 x 88 pixels with 16 colors.
screen = pygame.display.set_mode()
The GameObject class
The sprite module contains the Sprite class which can be used as a base class for our own GameObject class. All visible objects in our game are GameObjects. The Sprite class provides e.g. collision detection and drawing functionality. The GameObject class should take care of moving and the animation of the game object.
class GameObject(sprite.Sprite):

    # Initialize the GameObject.
    # Parameters:
    # - surfaces: The animation bitmaps.
    # - frameOffsets: The offset for each bitmap.
    def __init__(self, surfaces, frameOffsets):
        sprite.Sprite.__init__(self)  # Call the base class initalizer
        self.frames = surfaces
        self.frameOffsets = frameOffsets
        self.currentFrameNum = 0;
        self.image = self.frames[self.currentFrameNum]  # current image
        self.animDur = 3; # Duration in frames.
        self.animDurCounter = self.animDur;
        self.vx = 0
        self.vy = 0
        self.rect = self.frames[0].get_rect()

    # Set the velocity.
    # Parameters:
    # - vx, vy: The new velocity.
    def setvel(self, vx, vy):
        self.vx = vx
        self.vy = vy

    # Update the position and the animation frame.
    def update(self):

        # Advance frame if the animation is enabled.
        if self.animDur > 0:

            # if animation duration has elapsed, get the next the frame.
            if self.animDurCounter == 0:
                self.currentFrameNum += 1
                if self.currentFrameNum >= len(self.frames):
                    self.currentFrameNum = 0

                # Init the duration counter.
                self.animDurCounter = self.animDur

                # Set the current image and the current position.
                self.image = self.frames[self.currentFrameNum]
                self.rect.x += self.frameOffsets[self.currentFrameNum][0]
                self.rect.y += self.frameOffsets[self.currentFrameNum][1]
            else:
                # Decrement the duration counter.
                self.animDurCounter -= 1

        # Advance the position accordin the speed.
        self.rect.x += self.vx
        self.rect.y += self.vy
Creating sprites
Create the sprite groups. They can be used to update or check the collision of the group of sprites at one call.
all_sprites = sprite.Group()  # Contains all the sprites
all_frogittos = sprite.Group()
all_cars = sprite.Group()
Frogitto must be created as GameObject and added to the sprite groups, so it can be moved and animated. The initial position of Frogitto is at the bottom of the screen.
frogittoGob = GameObject(
    [spritedata.frogittoSurf_f1, spritedata.frogittoSurf_f2, spritedata.frogittoSurf_f3],
    [[0,0],[0,0],[0,0]])
frogittoGob.rect.x = 50
frogittoGob.rect.y = 70  # The bottom of the screen.
frogittoGob.animDur = 2;

# Add the sprite to the groups.
all_sprites.add(frogittoGob)
all_frogittos.add(frogittoGob)
We create 10 blue and red cars as GameObjects the same way as Frogitto. Initially, all cars are out of the screen, so they are not yet visible.
for i in range(10):

    # Create the car
    carGob = GameObject(
        [spritedata.bluecarSurf_f1, spritedata.bluecarSurf_f2],
        [[0,0],[0,0]])

    # out of screen
    carGob.rect.x = -100
    carGob.rect.y = -100

    # Add the sprite to the groups.
    all_sprites.add(carGob)
    all_cars.add(carGob)

    # Create the car
     carGob = GameObject(
        [spritedata.redcarSurf_f1, spritedata.redcarSurf_f2],
        [[0,0],[0,0]])

    # out of screen
    carGob.rect.x = -100
    carGob.rect.y = -100

    # Add the sprite to the groups.
    all_sprites.add(carGob)
    all_cars.add(carGob)
The main loop
Now that everything has been initialized, we can do the main game loop. The program executes this loop until the power is switched off.
vx = 0;
vy = 0;
frameNum = 0;
lastY = 0
while True:  # Loop forever.
Check if Frogitto has collided with any of the cars. The hit object points to the car (if any) which collided with Frogitto. If the collision has happened Frogitto is moved back to the starting point.
    hit = sprite.spritecollideany(frogittoGob, all_cars)
    if hit != None:
        frogittoGob.rect.x = 50
        frogittoGob.rect.y = 70
Use the event class in Pygame to poll for the key that is pressed. The state of any key of Pokitto can be checked this way. The type of the key event can be “up” or “down”.
    eventtype = pygame.event.poll()
    if eventtype != pygame.NOEVENT:
        if eventtype.type == pygame.KEYDOWN:
            if eventtype.key == pygame.K_RIGHT:
                vx = 1
            if eventtype.key == pygame.K_LEFT:
                vx = -1
            if eventtype.key == pygame.K_UP:
                vy = -1
            if eventtype.key == pygame.K_DOWN:
                vy = 1
        if eventtype.type == pygame.KEYUP:
            if eventtype.key == pygame.K_RIGHT:
                vx = 0
            if eventtype.key == pygame.K_LEFT:
                vx = 0
            if eventtype.key == pygame.K_UP:
                vy = 0
            if eventtype.key == pygame.K_DOWN:
                vy = 0
Set Frogitto’s velocity depanding on the key pressed or released.
frogittoGob.setvel(vx, vy);
The cars should appear in vertically random places and run from right to left. After certain amount of time (e.g. after 13 frames) we should find the first car that is out of screen, and give it a new starting point and velocity. The getrandbits() method is used to get a random y value for the car.
    if (frameNum % 13) == 0:
        # Get first free car and set the starting position
        for s in all_cars:
            # If the sprite is out of screen, it can be reused.
            if s.rect.x < -16:
                s.rect.x = 110
                y = 10 + random.getrandbits(8) * 60 // 256
                if abs(y - lastY) < 7:
                    if y < lastY:
                        y -= 7
                    else:
                        y += 7
                s.rect.y = y
                lastY = y
                s.setvel(-1,0) # Move to left
                s.currentFrameNum = 0
                break
The sprite group for all sprites takes care to call the update method and draw method for all the sprites. The update method moves the sprite, and the draw method draws the current animation frame to the current position on screen surface.
    all_sprites.update()
    all_sprites.draw(screen)
The flip() method copies the screen buffer to the actual display HW on Pokitto.
pygame.display.flip()
Finally, the frame number is increased in the end of the main loop.
    frameNum += 1
    if frameNum > 1000000:
        frameNum = 0;
The graphics_data.py file explained
This file just contains the game bitmaps in hexadecimal form. Each 8-bit hexadecimal value contains two 4-bit palette indices. The bitmap is defined as a Python bytes literal (“b”) so that it is stored to ROM memory. The bytes literal is converted to a surface.
Below is an example of one Frogitto frame.
frogitto_w = 8
frogitto_h = 8
frogittoPixels_f1 = b'\
\x00\x00\x00\x00\
\x00\xFC\xCF\x00\
\x70\xCC\xC7\x07\
\x77\xCE\xE7\x77\
\x00\xCE\xC7\x00\
\x0C\xC7\x77\x70\
\x0C\x00\x00\x70\
\x00\x00\x00\x00\
'
frogittoSurf_f1 = pygame.surface.Surface(frogitto_w, frogitto_h, frogittoPixels_f1)
The finalized files for the game
Frogitto_source_files.zip (4.5 KB)
Links
- An online Python Editor for Pokitto: https://pyinsky.herokuapp.com/
- a quick overview of the online Python Editor for Pokitto: https://youtu.be/-5XsHyB_1yk
- The official Python page: https://www.python.org/
- The official Micro Python page: http://www.micropython.org/
- The uPyGame reference wiki post: [Wiki][Draft]uPyGame library reference (for Micro Python in Pokitto)
- Mars Attack sources in the GitHub page: https://github.com/haviital/PokittoLib/tree/mars-attack-2-final/Pokitto/POKITTO_LIBS/MicroPython/src_py
- The Pokitto Robot Car posts: [Wiki] The Pokitto Robot Car, Part 1 and [Wiki] The Pokitto Robot Car, Part 2