[Tutorial]Building a Simple TileMap Game, Part 1 of 9

Building a simple Tilemap game.


The following article builds on a sample program that @Hanski published to show how the Tilemap class can be used. His code was written in Python but I have changed it to my preferred language, C++, to provide a corresponding resource in that language.

This tutorial is not necessarily trying to teach people to program in C++ and assumes you are familiar with the basics. The code is relatively simple so even if you are comping from a different language you will find the code easy to understand.

What is a Tilemap?

Tilemaps are a very common programming technique for creating 2D worlds out of reusable tiles. Typically, the world is very large and the player can only see a small section at a time as they move around. Using common tiles allows for extremely large worlds to be made on devices that have surprising little memory. The Pokitto API includes a small library that makes building a game based on a tile map easy!

Defining the World

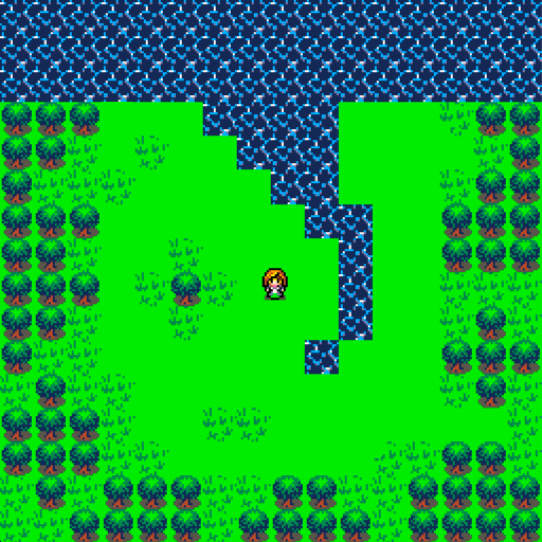
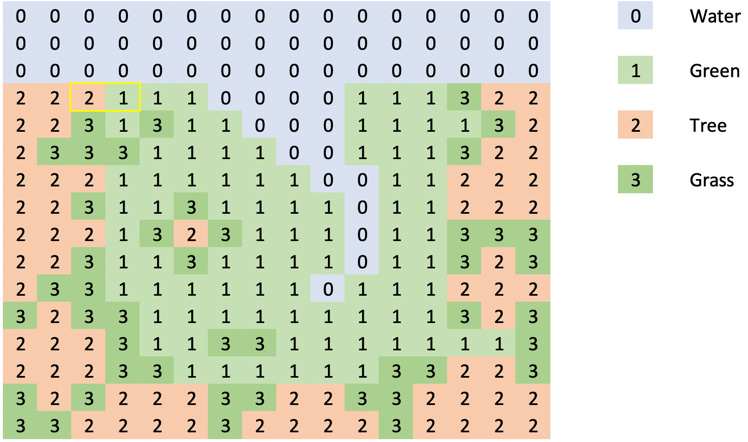
Take a look at the world map below that is featured in Hanski’s Python sample program. It consists of a world that is 16 tiles wide and 16 tiles high and utilises only 4 different tiles representing a green area that can be walked on and three obstacles - a bushy grass area, a tree and water.


The world itself is simply an array or values that tell the tilemap class what tile to render in each of the 16 x 16 locations. Each tile is assigned a number and, in the sample application, these are captured in an enumeration as shown below.

enum TileType {
    Water = 0,
    Green = 1,
    Tree = 2,
    Grass = 3,
};

To save memory, the current tilemap implementation limits the number of tiles to 16 and takes advantage of this by compressing two tiles into a single byte within the array. The array for our world is shown below alongside our world map. The highlighted cell shows a value of 0x21 corresponds to the area highlighted in the world map. As you can see the two nibbles (that’s what half a byte is called corresponds to a tree and a green tile).


Using this simple compression method, the array used to store our 16 x 16 tile world is only 128 bytes in size. It is not hard to imagine that a game with a single large world or multiple levels stored as multiple arrays or even an array of arrays! The Pokitto has enough memory to support a large universe.

Download and review the code in the repo https://github.com/filmote/Tilemap_1

This is a literal translation of @hanski’s original python version with minor changes for clarity. In addition to the enumeration, defined above, the code to initialise the tilemap class is shown below. The tilemap.set() command configures the tilemap object with size of the world (16 tiles wide by 16 tiles high) and the data array to use, Data::mapPixels.

The remaining four lines of the code assign the map data indexes to the images to be rendered. Using the enumeration values rather than literals makes the code much more readable.

enum TileType {
    Water = 0,
    Green = 1,
    Tree = 2,
    Grass = 3,
}; 

Tilemap tilemap;

int main(){

    … 
    tilemap.set(16, 16, Data::mapPixels);
    tilemap.setTile(TileType::Green, 16, 16, Data::green16);
    tilemap.setTile(TileType::Tree, 16, 16, Data::tree16);
    tilemap.setTile(TileType::Grass, 16, 16, Data::grass16);
    tilemap.setTile(TileType::Water, 16, 16, Data::water16);
    …
}

When we are ready to render our viewport, we simply call tilemap.draw(x, y);


<< Prev | Next >>

Part 1 of 9: Building a Simple Tilemap Game
Part 2 of 9: Moving a Player Around the World
Part 3 of 9: Rendering the Viewport and Player
Part 4 of 9: Detecting Obstacles
Part 5 of 9: Adding Enemies
Part 6 of 9: Using FemtoIDE and Piskel
Part 7 of 9: Doors and Inventory Items
Part 8 of 9: Multiple Worlds
Part 9 of 9: Sixteen Tiles Only?

6 Likes

Very nice! I like the simplicity of the example.

coming?

There is no highlight

The “bold” formatting is not visible.

Maybe the source code needs few more comments (I know my Python code probably needs too :wink: )

Ahh … this is why I asked for people to proof-read before I publish (not the bold there!).

And now I have to wait 22hours before editing again!

I did see it, but I thought at this moment that you meant “to participate in a competition” :laughing:

Could you kindly attach the full tutorial as document? Maybe a PDF? I’d love to print this on paper.

You can find the docs here > https://github.com/filmote/Tilemap_Docs

2 Likes

Filmote awarded “Community Builder” for tilemap tutorials AND well-commented, well-written open source Press Play On Tape games!

Congratulations!

community builder @filmote

8 Likes

Shucks … thanks guys!

3 Likes

Thanks for the excellent writeup. I think I understood most of that. You did lose me a bit though. I’m looking at the Tilemap_1 code in FemtoIDE, I don’t understand where you told it you were wanted TAS mode and Lo vs Hi res. I thought it would be something in My_settings.h, but I don’t see it.

1 Like

Thanks for the feedback.

I am using Mode15 (which is 220 x176, 8 colours) as you can see in the My_Settings .h file. Since this article was written, the TileMaps has come along nicely.

@FManga should I update the tutorials to use the new modes or are the old modes still valid?

1 Like

The old modes are still valid, but it would be good to use the documented settings file:

1 Like

Yep I can do that.

But is PROJ_SCREENMODE TASMODE high (220x176) or low res (110x88)?

Also, is MAX_TILE_COUNT still valid? I pushed this into the lib a month or two ago?

Edit: It seems like it still is but maybe it should be named PROJ_MAX_TILE_COUNT instead.

I just updated the file, mode13 was duplicated and TASMODELOW was missing. TASMODE is high res, TASMODELOW is low.
MAX_TILE_COUNT is still valid.

1 Like

OK … I will update the tutorials and sample code (soon) !

2 Likes

Ah, OK, I was getting confused between Tilemap and TAS. Thanks.

OK, I had a couple of problems that combined to confuse me.

First, the first demo, tilemap_1 is not using Mode 15, it’s definitely low res as there’s only 7 tiles across the screen. It has PROJ_MODE2 set to 1, In retrospect I guess that’s Mode 2, but I couldn’t find that in the forum using the search.

Secondly, when I tried to make changes to the settings file, nothing worked. It seems you have to do a clean first. Build & Run just seems to use the previous settings. So all of the experimenting I did, I was just running the same thing over again. I finally accidentally did a clean while at the same time made a change to the settings file that was valid.

TLDR, I’m good now. All I really wanted was for the simple demo to work in hi res.

Thanks,

1 Like

In the tutorial, I use mode 2 and mode 15 to show the variations. In Part 3, I even say …

… in case I have an error in the documentation, what made you assume the first demo should be in mode 15?

Yep … this is a FemtoIDE thing - a real gotcha. Is there a logical place I can add that to the tutorial do others can learn this little trick?

OK … sorry if the tut confused you. I am keen to fix any thing that can be made more explicit or simplified if I have assumed too much knowledge.

1 Like

The problem was I didn’t know what resolution mode it was. I didn’t know I could change that in the settings file, and when I figured that out, I didn’t even know PROJ_MODE2 was a resolution setting. I think moving to that new settings file will fix that, or just add a comment to the old one. But, I would have figured that stuff out pretty quickly if I’d known about the clean, it was the combination that threw me. Maybe a comment in the settings file for that? and mention the settings file when talking about the resolution?

Thanks for your work on the tutorial. I picked it to start with because I liked the way it broke things down with simple examples that built on each other. I don’t like to drink from fire hoses.

Thanks for the feedback - I will update the tutorials with the full MySettings.h file and include the instructions on how to rebuild.

2 Likes