[Tutorial] Pipes Part 1 - Additional Information

Changing Palettes in FemtoIDE

In your code …


The Pokitto library contains a number of colour palettes that cover a range of common platforms. By default, the Pokitto uses the CGA palette which is adequate but not inspiring. To change to a different palette, say Pico8, follow these instructions.

Navigate to the main.cpp file. You may see the loadRGBPalette() command as shown below or not depending on whether the program uses the default CGA palette or not.

using PC = Pokitto::Core;

using PD = Pokitto::Display;

int main() {

  PC::begin();
  PD::loadRGBPalette(paletteCGA);
  …

}

To use the Pico8 palette, simply change or add this line :
PD::loadRGBPalette(palettePico);

In Piskel …


But this is only half of it! The FemtoIDE compiles contains an embedded Piskel editor. To ensure that Piskel knows about your new palette, download a .PAL file from the internet (try here > https://lospec.com/palette-list/pico-8) and import it for use.

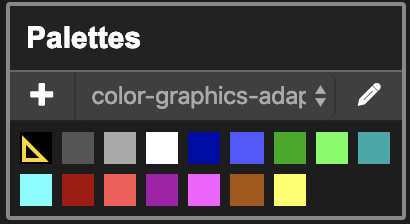
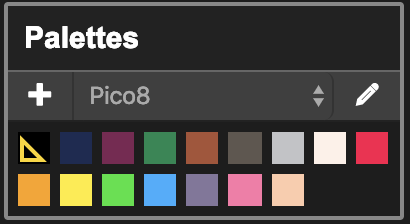
  • Step 1 In the Piskel editor, you see there is a palette selector and by default it is set to color-graphics-adaptor and that you can scroll through other loaded palettes. Unfortunately, there are no others, so you need to load one.

        Pico1

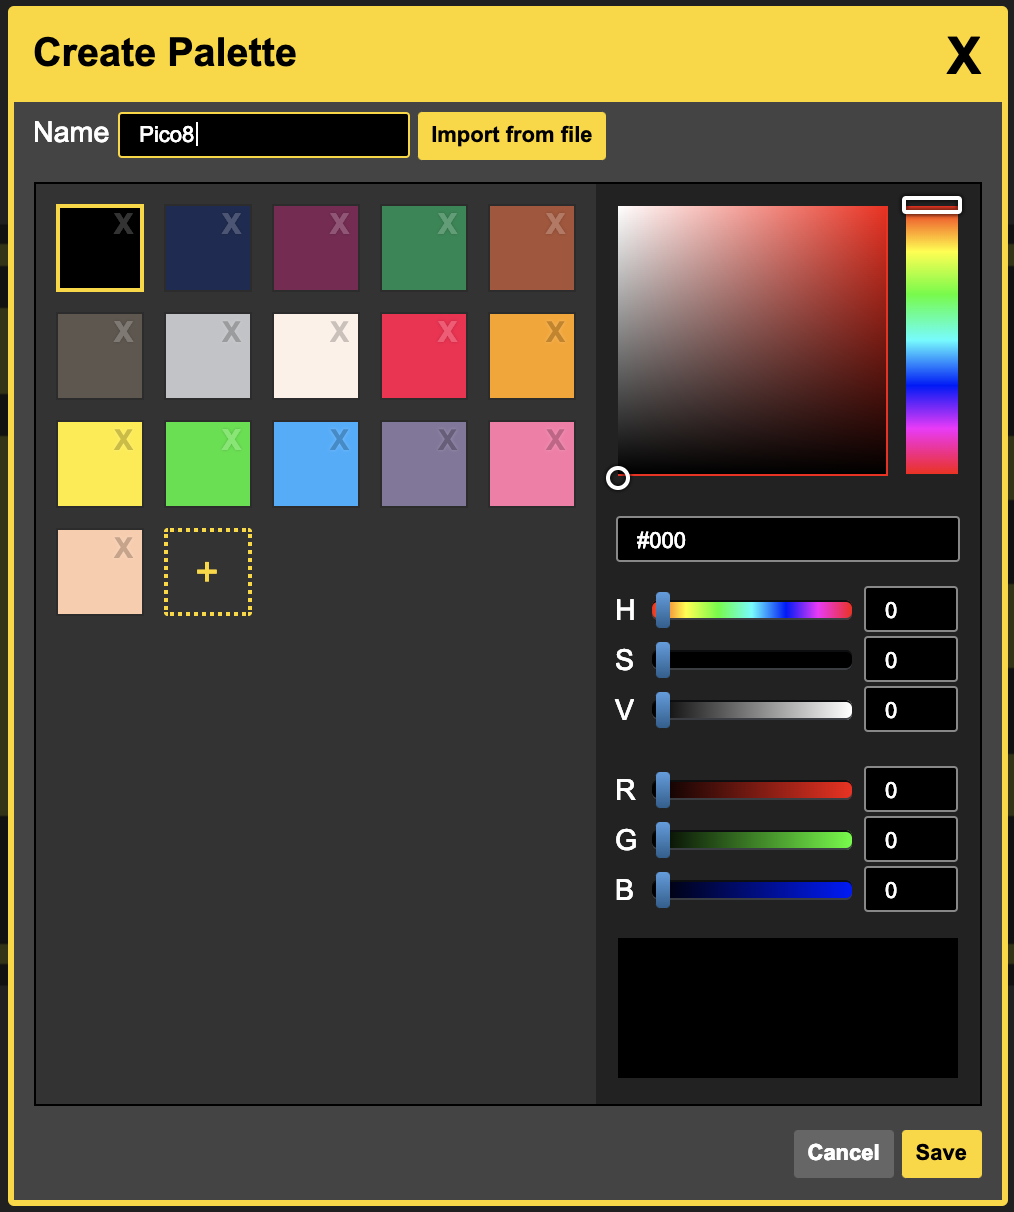
  • Step 2. Click the plus symbol to add a new palette. This will reveal the Create Palette dialogue.
            

  • Step 3 . Click on Import from file and load the .PAL file you downloaded from the internet. You will now see the colours in the Pico8 palette – much nicer than CGA – and you can give the palette a meaningful name. Click Save to complete the action.
            

  • Step 4 . Select the newly created palette from the palette selector. From now on, anything you draw in Piskel will be in the Pico8 palette.

        Pico4

In the FemtoIDE’s Automatic Image Compilation …


Finally, the FemtoIDE has a powerful feature that compiles graphics automatically into data files that can then be directly incorporated into your game. This feature uses a setting in the My_settings.h file and the default values are shown below.

{
  "lastBuffer": "main.cpp",
  "PNGFlags": {
    "ALL": [    "palette=${appPath}/PokittoLib/Pokitto/POKITTO_CORE/PALETTES/palCGA.cpp"
    ]
  },
…

To use the Pico8 palette, change the palette name as shown below.

{
  "lastBuffer": "main.cpp",
  "PNGFlags": {
    "ALL": [
"palette=${appPath}/PokittoLib/Pokitto/POKITTO_CORE/PALETTES/palPico.cpp"
    ]
  },
…

Details of the standard Pokitto palettes can be found here .

1 Like

Program Memory vs RAM?


The Pokitto offers 256Kb of memory to store programs (known as Program Memory or Flash memory) and 36KB of RAM to store variables used when executing a program. Once the Pokitto core libraries have been included, these figures reduce significantly! Without forward planning, it is very easy to write programs that run out of either memory quickly.

Static data like the puzzle configurations in Pipes lend themselves to being stored in program memory as they are relatively large (especially when storing hundreds of puzzles) and static. You can tell the compiler that you want something stored in program memory, rather than RAM by using the const keyword.

const uint8_t puzzles_5x5_count = 2;

What is an Array?


Arrays are a data structure that can store a collection of items - bytes (known as uint8_t in C++), integers or even other objects. Arrays can be single- or multi- dimensional and the items are retrieved using an index. Arrays in an Pokitto environment have a fixed size and cannot be resized.

For example, the following snippet of code defines a one dimensional array of 5 items and populates the 3rd item.

int newArrayA[5];
newArrayA[2] = 23;

Notice that when we want to read the 3rd item from the array we actually use the index of 2. This is because in C / C++ the first position in the array is referred to a position 0. The last item ion the array can be retrieved using the index 4 which is the size of the array, 5, less 1.

Arrays can have multiple dimensions and each dimension is declared with its own size in specified in square parenthesis. For example, the code below defines an array that is 5 columns wide and 3 columns high. It then populates the cell that is in the 4th column of the 2nd row.

int newArrayB[3][5];
newArrayB[1][3] = 666;

Again, notice that the indexes are zero-based. Also notice that the declaration of the array defined the row first, followed by the column. When referring to the array using X and Y coordinates, this produces the counter-intuitive syntax of a[y][x].

Arrays can be populated as part of their declaration. The two declarations above can be extended to include initial values, as shown below:

int newArrayA[5] = { 0, 1, 2, 3, 4 };

int newArrayB[3][5] = {
  { 1, 2, 3, 4, 5 },      // row 0  
  { 6, 7, 8, 9, 10 },     // row 1 
  { 11, 12, 13, 14, 15 }  // row 2
};

Finally, the number of items in the array can be returned using the sizeOf() function. Be warned though that this returns the number of bytes the array uses not the number of items. The sizeOf() function will return a value of 10 for the declaration int newArrayA[5] as each integer takes up two bytes. The number of items in the array can be determined by dividing the size of the array in bytes by the size of the data type, for example:

int numberOfItems = sizeof(newArrayA)/sizeof(int)

Decimal vs Binary vs Hexadecimal Numbers


Humans have ten fingers so it’s no wonder we have a number system based on that fact. The Hindu-Arabic numbering system which we all use is known as a positional, decimal numbering system where each column increases in value by a factor of ten. This is totally different to Roman numerals which use a range of different letters to represent different values.

With a decimal number 137, we can break it down to 1 x 100, 3 x 10 and 7 x 1.

image

Computers store numbers as ones and zeroes in a system known as binary. Like the decimal system, each column is two times the value of the previous one. The decimal number 137 is represented as 10001001 in binary. The image below shows the number 10001001 with the decimal equivalent column value above. If you break it down, 1 x 128, 1 x 8 and 1 x 1 = 137 decimal.

image

But what about Hexadecimal?

Using ones and zeroes to communicate with a computer is not really human-friendly so we convert the binary numbers into a number system known as hexadecimal (or hex for short) where each column is 16 times greater than the one before it. The numbers range from 0 to 9 and then from A to F to represent the 16 ‘numbers’. So the decimal number 3 is the same as the hex value 3 and the decimal number 9 is the same as the hex number 9. The decimal number 10 becomes the hex ‘number’ A, likewise 11 becomes B and 15 becomes F. The decimal number 16 is the equivalent of the hex number 10, 17 decimal equals 11 hex and so on.

But why hexadecimal? If you recall I said computers use zeroes and ones – referred to as a bit - and groups them together in lots of eight which are known as a byte (8 bits equals 1 byte). A byte can hold a value between 0000 0000 (decimal 0) and 1111 1111 (decimal 255). Four bits can hold a value between 0000 (decimal 0) and 1111 (decimal 15) – which just happens to align with the range of a single hexadecimal value. So we use hexadecimal as it is easy for humans to read and dead simple for a computer to convert into binary.


image

Bit Manipulation


As we discussed earlier, we can use hexadecimal notation when specifying arrays and save space by combining two values into one byte. When we read the data back we need to easily be able to split the two digits apart.

As we saw, the decimal value 137 was equal to the hexadecimal value 0x89 and the binary number 10001001.

If we want to retrieve the 8 from 0x89 we can perform what is known as a ‘4 bit left shift’. A ‘left shift’ moves all values one location to the left while discarding the left most value. After four shifts, 0x89 becomes …


1000 1001    (Original number of 0x89)
0100 0100    (1st shift)
0010 0010    (2nd shift)
0001 0001    (3rd shift)
0000 1000    (4th shift)


… and convert this back to hex, we end up with 0x08. In C / C++ notation this is represented as 0x89 >> 4.

If we want the 9 value from 0x89, we can perform some Boolean trickery by logically ANDing the value with 0x0F. This is best visualized using binary representations of the number:


          1000 1001    (0x89)
AND  0000 1111    (0x0F)
          --------------
          0000 1001    (0x09).


In C / C++ notation this is represented by the code 0x89 & 0x0F.