After a lot of trial and error using an example provided by @FManga I have successfully figured out how to create a custom editor for a project. This example allows you to create some files purely within your project’s directory and doesn’t require modding FemtoIDE in any way (ie. you don’t need to have people copy stuff into the plugins directory for this to work).
Step 1: Determine a custom file extension for your data
The first trick to this template is to determine what file extension you want to register for your custom editor. This example uses the extension “CE” (ie. somefile.ce) but you can choose any extension you’d like.
Step 2: Create the script that hooks your editor into FemtoIDE
Create a “scripts” folder inside your project folder
Create a new javascript file CustomEditor.js inside the scripts folder (you can replace “CustomEditor” with a name for each specific editor you wish to create).
Add the following javascript to this file:
CustomEditor.js
//!APP-HOOK:addMenu
//!MENU-ENTRY:Custom Editor

if(!APP.customEditorInstalled()){
  APP.log("Adding custom editor");

  // list of file extensions this view can edit
  const extensions = ["CE"];

  // path to the html to load
  // file path will be concatenated after the "?"
  const prefix = `file://${DATA.projectPath}/editor/editor.html?`;

  // add extensions for binary files here
  Object.assign(encoding, {
    "CE":null
  });

  class CustomEditorView {

    // gets called when the tab is activated
    attach(){
      if( this.DOM.src != prefix + this.buffer.path )
        this.DOM.src = prefix + this.buffer.path;
      this.DOM.contentWindow.readFile = this.readFile;
      this.DOM.contentWindow.saveFile = this.saveFile;
    }

    // file was renamed, update iframe
    onRenameBuffer( buffer ){
      if( buffer == this.buffer ){
        this.DOM.src = prefix + this.buffer.path;
      }
    }

    readFile(filePath, mode)
    {
      return window.require("fs").readFileSync(filePath, mode);
    }

    saveFile(filePath, data)
    {
      window.require("fs").writeFileSync(filePath, data);
    }

    constructor( frame, buffer ){
      this.buffer = buffer;
      this.DOM = DOC.create( frame, "iframe", {
        className:"CustomEditorView",
        src: prefix + buffer.path,
        style:{
          border: "0px none",
          width: "100%",
          height: "100%",
          margin: 0,
          position: "absolute"
        },
        load:function(){
        }
      });
    }
  }

  APP.add(new class CustomEditor{

    customEditorInstalled(){ return true; }

    pollViewForBuffer( buffer, vf ){
      if( extensions.indexOf(buffer.type) != -1 && vf.priority < 2 ){
        vf.view = CustomEditorView;
        vf.priority = 2;
      }
    }

  }());

}
On line 8: const extensions = ["CE"]; replace "CE" with a list of extensions you want your editor to handle.
On line 16: "CE":null replace “CE” with any extensions that are binary files (additional ones can be added with a as standard json type array.
On line 12: const prefix = file://${DATA.projectPath}/editor/editor.html?; replace /editor/editor.html with the location of your editor’s html file relative to the project path (don’t forget to leave the ? at the end as the path of the file to edit will be appended here)
You can define additional custom functions by adding them after the saveFile function definition
This is only necessary if the function requires access to the node.js routines (such as file i/o)
Example:
myFunction(myParameter1, ...) // functions can have zero or more parameters
{
  //Do stuff here
}
Then hook it to your editor by adding this.DOM.contentWindow.myFunction = myFunction; after the line: this.DOM.contentWindow.saveFile = this.saveFile;
Step 3: Create your custom editor
Create an “editor” folder in the root of your project (you can name it something else just remember to adjust the above script to point to the correct location)
Add the following template html file to the “editor” folder
editor.html
<!DOCTYPE html>
<html lang="en">
  <head>
  </head>
  <body onload="">
    <form>
      <button type="button" onclick="load()">Load</button>
      <button type="button" onclick="save()">Save</button><br/>
      <input type="text" id="testText" value="">
    </form>
    <script src="editor.js"></script>
  </body>
</html>
Add the following template javascript to the “editors” folder:
editor.js
function load()
{
  var filePath = window.location.search.substr(1);
  document.getElementById("testText").value = window.readFile(filePath, "utf-8");
}

function save()
{
  var filePath = window.location.search.substr(1);
  window.saveFile(filePath, document.getElementById("testText").value);
}
Step 4: Create some files to edit
For this demo you can create the following text file at the root of your project:
bacon.ce
Need more bacon!
Step 5: Open the file inside FemtoIDE
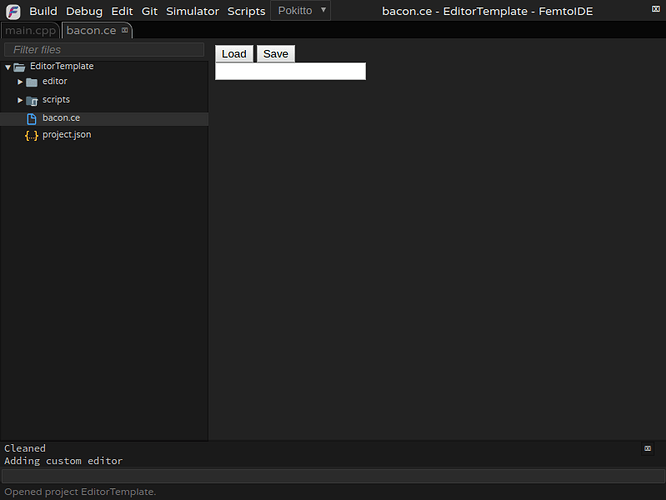
Clicking the “bacon.ce” file from inside FemtoIDE should open it with the custom editor which currently looks like this:
Clicking the “Load” button should read the contents of the “bacon.ce” file into the text field below
Clicking the “Save” button should save the contents of the text input to the “bacon.ce” file (you can verify this by opening the “bacon.ce” file in an external text editor)
Step 6: Create your own custom web-based editor
From here it’s just a matter of using whatever html5 magic you like to create a full custom editor and making calls to window.readFile(filePath, mode) to read files and window.saveFile(filePath, data) to write files.
How to actually use things like html5 canvas to make a custom editor is beyond the scope of this part of the tutorial, but from here on out there’s nothing more you need to worry about with utilizing FemtoIDE as everything else can be done with pure HTML5, CSS, and JavaScript.
EDIT: If you want to read the contents of a binary file simply call window.readFile(filePath) without providing a mode or pass null for mode.
EDIT 2: Modified the instructions to change where to hook the readFile and saveFile functions to the contentWindow (previous method only works the first time the editor is opened).
