Multiple Worlds
So far, we have only dealt with only one world map which, although fun, is kind of limiting. In this section, we will expand our world to contain three separate ones. For simplicity, I have kept the dimensions of the three worlds identical but this doesn’t need to be the case. At the end of the section I will detail what needs to be changed in order to have the worlds different dimensions.
Our three worlds are shown below. I have designed them so that moving from one world to the next brings you into the new world from the opposite side but same height as the previous world. This is also a simplification I have made but - as with the worlds of different dimensions - I will detail the changes that need to be made to accommodate different starting locations.
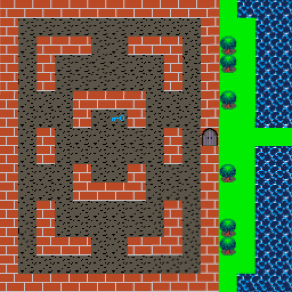

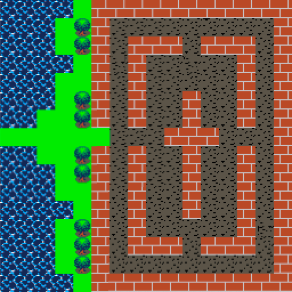
Download the code in the repo https://github.com/filmote/Tilemap_6 and run it. You can now move between the different worlds freely. You will notice that each level has a different number of enemies and that they start in different locations.
Firstly, let’s look at the data for the three worlds as defined in the Data.h file. These are defined as three separate arrays using the same logic we have used so far. Once defined, pointers to the three arrays are included in a fourth array called worldMaps which allows the rest of the code to refer to the world array by index.
namespace Data {

    const uint8_t worldMap_0[] = {
        0x44, 0x44, 0x44, 0x44, 0x44, 0x44, 0x10, 0x00,
        …
    };

    const uint8_t worldMap_1[] = {
        …
    };

    const uint8_t worldMap_2[] = {
        …
    };

    const uint8_t * const worldMaps[] = {

        worldMap_0, worldMap_1, worldMap_2

    };

};
The number of enemies and starting positions for each are also defined in the Data.h file alongside the world data. There are three definitions - one for each world – and they consist of 7 values. The first value specifies the number of enemies in the world and the remaining 6 values the x and y positions of each enemy.
As with the world data, pointers to the enemy starting position arrays are added to a fourth array to allow our code to access them by index.
I have limited the number of enemies to three but this could easily be extended.
namespace Data {

    …

    // Enemy starting positions ..

    const uint16_t startingPostions_0[] = {
        3, 81, 49, 161, 49, 193, 64
    };

    const uint16_t startingPostions_1[] = {
        1, 80, 80, 0, 0, 0, 0
    };

    const uint16_t startingPostions_2[] = {
        2, 98, 49, 161, 49, 0, 0
    };

    const uint16_t * const startingPostions[] = {

        startingPostions_0, startingPostions_1, startingPostions_2

    };

};
With the world data and starting positions defined in arrays, we can alter the initWorld() function presented earlier to accept a parameter to indicate which world to load. The revised code is shown below and loads the world data in a similar way to that shown previously and the enemy starting positions.
Previously, the variable numberOfEnemies had a constant value of three. It has now been made a global variable and is populated as part of the initWorld() function however the code that moves and renders the enemies remains unchanged as it used this constant as an upper limit when looping.
uint8_t worldMap[Constants::mapTileWidth * Constants::mapTileHeight / 2];
uint16_t numberOfEnemies = 0;

void initWorld(uint8_t worldIndex) {


    // Populate the world data ..

    for (uint16_t i = 0; i < Constants::mapTileWidth *
                             Constants::mapTileHeight / 2; i++) {

        worldMap[i] = Data::worldMaps[worldIndex][i];
    }


    // Populate the enemy starting positions ..

    numberOfEnemies = Data::startingPostions[worldIndex][0];

    for (uint8_t i = 0; i < numberOfEnemies; i++) {

        enemies[i].x = Data::startingPostions[worldIndex][(i * 2) + 1];
        enemies[i].y = Data::startingPostions[worldIndex][(i * 2) + 2];

    }

}
I have conveniently laid out my three worlds so that moving to the right from one world to another increases the index of the current world and moving from right to left decreases it. This sort of transition can easily be accommodate by testing to see if the player is moving off the edge of the world map as part of the handlePlayerMovements() function.
Moving off the map to move to the next world is common however it may not always be the case. For example, you might traverse to the next world by climbing up (or down) a staircase located in the middle of the world itself. These transitions can also be handled in the handlePlayerMovements() function in much the same way as the key was picked – by testing to see if the player has moved onto a special tile.
The code below shows the changes that have been made to cater for the left and right movements off the world map. Whereas previously we prevented the player from ever being able to move outside of the world map, we now allow this movement and increase or decrease a global variable that contains the current world index accordingly. When the player has moved completely off the left or right hand side, we reposition them to the opposite side of the world so that they can enter from the correct side.
uint8_t currentWorld = 0;

void handlePlayerMovements() {

    if (PC::buttons.pressed(BTN_LEFT) || PC::buttons.repeat(BTN_LEFT, 1)) {

        if (player.x - 1 <= 0) {

            player.x--;

            if (player.x = -1) {

                player.x = Constants::worldWidth - 1;
                currentWorld--;
                initWorld(currentWorld);

            }

        }
        else if (checkMovement(player, player.x - 1, player.y,
                               Direction::Left)) {

            player.x--;

        }

    }

    if (PC::buttons.pressed(BTN_RIGHT) || PC::buttons.repeat(BTN_RIGHT, 1)) {

        if (player.x + 1 >= Constants::worldWidth - player.width) {

            player.x++;

            if (player.x == Constants::worldWidth) {

                player.x = -player.width + 1;
                currentWorld++;
                initWorld(currentWorld);

            }

        }
        else if (checkMovement(player, player.x + 1, player.y,
                               Direction::Right)) {

            player.x++;

        }

    }
    …
}
As pointed out earlier, this approach is a simplification and relies on a number of key points. Firstly, it assumes the worlds are lined up from left to right in order. Secondly, it assumes that you will leave the current world and enter the next at the same **y** height. The final two compromises are that the worlds are of the same dimensions and that they are designed to prevent you from exiting where you should not. I have achieved this by bordering the left and right edges of the individual world maps with bricks and water.
The first compromise can easily be overcome by coding the conditions to handle the progression through worlds rather than assuming they are linear.
The second compromise can be overcome by altering the Data.h file and initWorld() code to include a player starting location similar to the enemy starting positions.
Changing the dimension for each world is a little more complex. The initialisation of our tilemap, which currently is in our main() function, could be moved to the initWorld() function with the world dimensions (16 x 16) being read from a configuration array similar again to the enemy start positions.
Doing so also allows you to reassign the tiles to a different set if, for example, one world was indoors and the next outside. This following pseudo-code shows how this might be achieved. This approach would allow you to change your tile set for different game levels / worlds while still using only 16 tiles.
    tilemap.set(16, 16, worldMap);

    if (indoors) {

        tilemap.setTile(TileType::Brick, Images::brick16);
        tilemap.setTile(TileType::Door_Open, Images::door_open16);
        tilemap.setTile(TileType::Door_Closed, Images::door_closed16);
        tilemap.setTile(TileType::Key, Images::key16);
        tilemap.setTile(TileType::Carpet, Images::carpet16);

    }
    else {

        tilemap.setTile(TileType::Green, Images::green16);
        tilemap.setTile(TileType::Tree, Images::tree16);
        tilemap.setTile(TileType::Grass, Images::grass16);
        tilemap.setTile(TileType::Water, Images::water16);

    }
Part 1 of 9: Building a Simple Tilemap Game
Part 2 of 9: Moving a Player Around the World
Part 3 of 9: Rendering the Viewport and Player
Part 4 of 9: Detecting Obstacles
Part 5 of 9: Adding Enemies
Part 6 of 9: Using FemtoIDE and Piskel
Part 7 of 9: Doors and Inventory Items
Part 8 of 9: Multiple Worlds
Part 9 of 9: Sixteen Tiles Only?